Dockerizing an ASP.NET Core application with GitHub, Docker Cloud and Azure
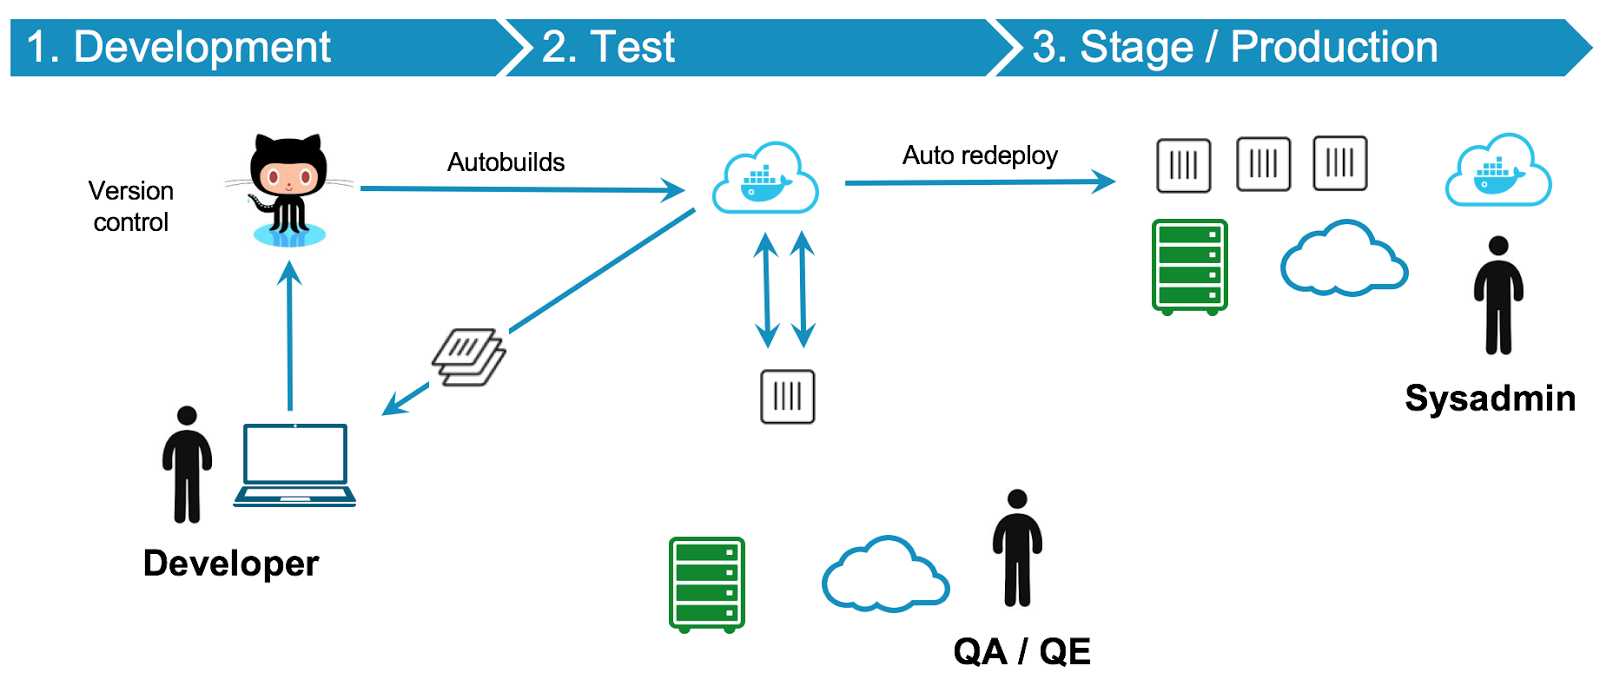
In this article, we will take the simplest ASP.NET Core application, run it with Docker locally, then create Continuous Integration and Continuous Deployment flows using a GitHub repository, Docker Cloud and an Azure virtual machine that will act as a node for Docker Cloud.
If you don’t want to create an ASP.NET Core application but are interested in the CI/CD workflow, or if you already have a GitHub repository with a complete application with a Dockerfile, you might want to skip to the part we start creating the CI/CD workflow.
Moving parts and used components
The main part of a CI/CD workflow like this is the application itself. It can be however complicated, but in this case I want to emphasize the workflow itself and will only build a very simple application with ASP.NET Core.
Note that you can use this article with any single-container application you want to build.
However, if you want to build multi-container applications, you will most likely need a way to compose and orchestrate those containers. In future articles, we will also deal with multi-container applications, but in this one we will keep things easy.
We will create a GitHub repository that we will use to create a Docker image and push it to Docker Hub.
Docker Hub is a cloud-based registry service which allows you to link to code repositories, build your images and test them, stores manually pushed images, and links to Docker Cloud so you can deploy images to your hosts. It provides a centralized resource for container image discovery, distribution and change management, user and team collaboration, and workflow automation throughout the development pipeline.
More information about Docker Hub on the Official Docker Documentation.
Then, we will configure an Azure VM to be a node for Docker Cloud and Docker Cloud will automatically publish containers to that VM. Then, every time there are changes in the GitHub repository, Docker Cloud will build the image and publish the container again automatically.
More information about Docker Cloud on the Official Docker Documentation.
Create a GitHub repository
First, we need a GitHub repository. If you already have a repo with an application you want to use you can do that. However, I will create a new repo and clone it on my computer.
Note that you can follow this article regardless of your computer OS. It can be done with Windows, Linux or macOS.
In creating this article, I used macOS, with Docker for Mac and Visual Studio Code.
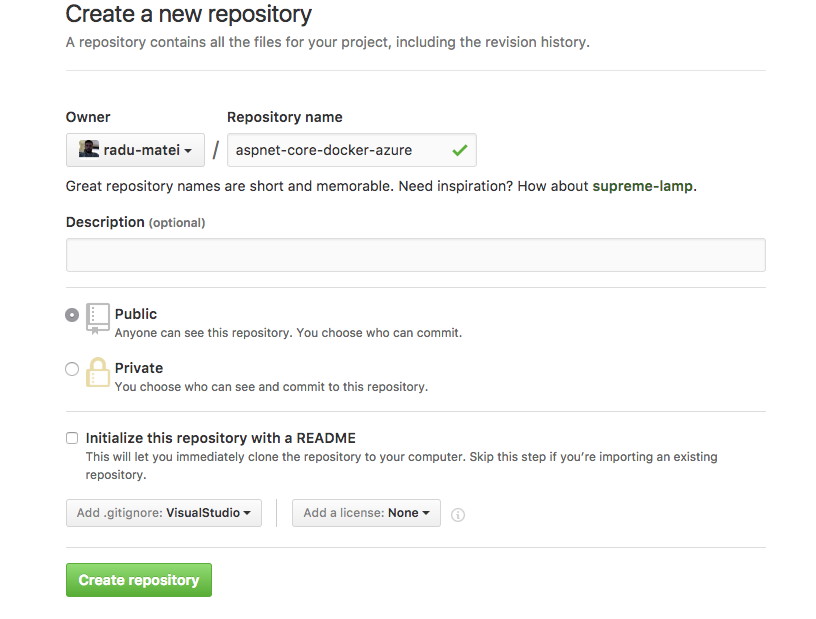
Since this is a .NET Core application, I chose to add a .gitignore file that will ignore all .NET specific output files after building the application.
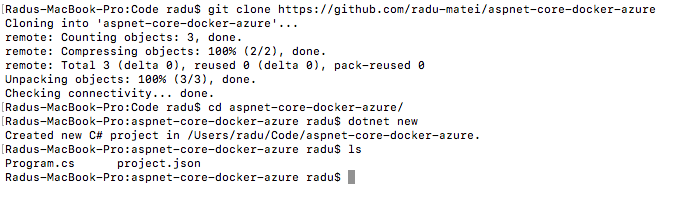
Create the repository, then clone it somewhere locally on your computer. In my case, I would execute git clone https://github.com/radu-matei/aspnet-core-docker-azure.
Creating the ASP.NET Core application
This will be the part with the least focus in this article, since we have covered building ASP.NET Core applications for a while now and you can find a lot resources on this topic, including some on this site.
For ASP.NET Core tutorials, you can take a look at some resources on this blog, consult the official documentation, or you can watch this Microsoft Virtual Academy course presented by Scott Hanselman and Maria Naggaga.
Basically, we will create the same application as explained in this blog post, but we will build it against .NET Core 1.0.1 (which is the latest stable version at the moment of writing this article).
While .NET Core 1.0.1 is the latest version at the moment of writing this article, you can also use other versions, since the Docker images are available on Docker Hub.
In the folder that was just created from cloning the repository, execute dotnet new in order to create a new .NET Core application.
Now depending on the .NET Core version you have installed on your machine, project.json will look slightly different:
"Microsoft.NETCore.App": {
  "type": "platform",
  "version": "1.0.1"
}
Since 1.0.1 is the latest stable version, we will use it as example for this application.
You can use any version available on your machine and as image from Microsoft on Docker Hub.
Add the required Kestrel dependency in project.json, keeping in mind that the version is 1.0.1 and respond to any incoming request with a message and the current date and time of the server:
public static void Main(string[] args)
    {
        var host = new WebHostBuilder()
            .UseKestrel()
            .Configure(app => app.Run(context =>
            {
                return context.Response.WriteAsync($"Hello, Universe! It is {DateTime.Now}");
            }))
            .Build();

        host.Run();
    }
And this is the entire ASP.NET Core application we will use for this article.
Writing the Dockerfile
Docker can build images automatically by reading the instructions from a Dockerfile. A Dockerfile is a text document that contains all the commands a user could call on the command line to assemble an image. Using docker build users can create an automated build that executes several command-line instructions in succession.
More information on the Dockerfile on the Official Docker Documentation
Basically, the Dockerfile is like a recipe for building container images. It is a script composed of multiple commands executed successively to create images based on other images.
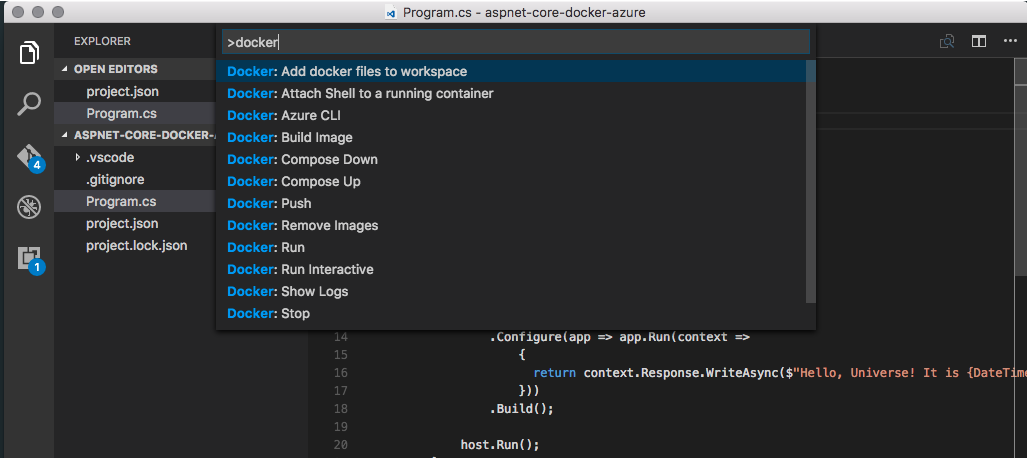
You have two options for writing the Dockerfile: you can write it manually, or you can have VS Code write it for you. If you install the VS Code Docker extension, press F1 and search for Docker, you should see something similar to:
In this case, we will write the Dockerfile manually, mainly because we want to understand all the things involved.
Create a new file called Dockerfile (without extension) to the root of the application (in this case in the same folder as project.json and Program.cs) with the following content:
FROM microsoft/dotnet:1.0.1-sdk-projectjson

COPY . /app
WORKDIR /app

RUN ["dotnet", "restore"]
RUN ["dotnet", "build"]

EXPOSE 5000/tcp
ENV ASPNETCORE_URLS http://*:5000

ENTRYPOINT ["dotnet", "run"]
The content of the Dockerfile is pretty self-explanatory:
- it gets a base image that has
dotnetinstalled, themicrosoft/dotnet:1.0.1-sdk-projectjsonimage - it copies the source of the application inside the container, in the
/appfolder - it sets the
/appfolder as the working folder where the commands will be executed from - executes
dotnet restoreanddotnet build - expose the 5000 port
- sets the environment variable for ASP .NET Core in the container
- when the container starts it will execute the
dotnet runcommand
In this case, we both build and run the application inside the container. In a production environment, we would only use the
dotnet runtimeimage from Microsoft that is only able to execute applications and not build them. This would result in a much smaller footprint of the image.
Building the image
At this point, we have configured the application (which wasn’t that hard), we have a definition for Docker, our Dockerfile, but we haven’t built an image or a container so far.
The end result is for us to start a container. Every container is built upon an image, that is composed of the application itself and its dependencies.
To build the image, simply run the following command in the same folder with the Dockerfile:
docker build -t aspnet-core-docker-azure
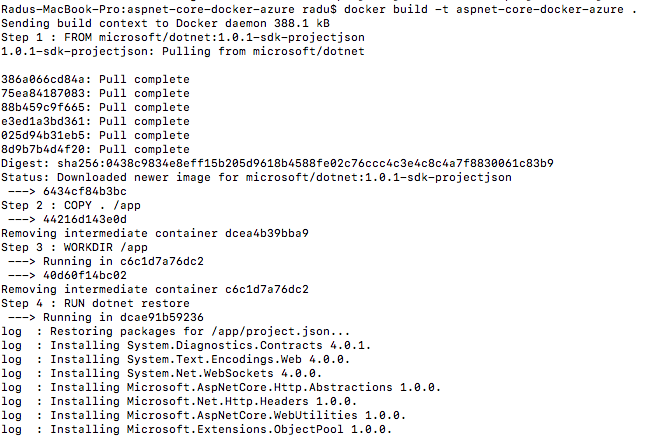
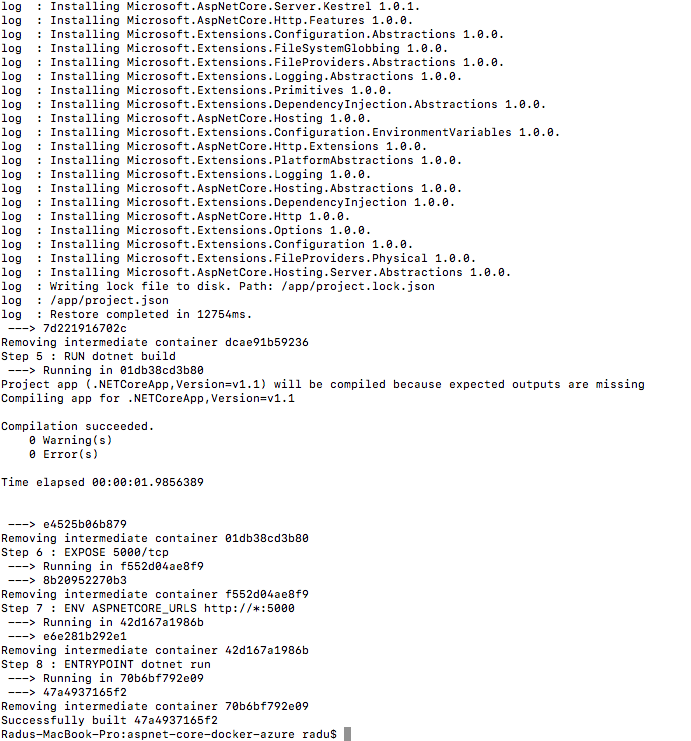
You can clearly see how each step in the Dockerfile is executed successively and how at every step an intermediate container gets created. This is done so that if the execution fails at let’s say STEP 7, all progress made up to that point doesn’t get lost. After every successful step executed, the previous container is removed.
Running docker images should show you the newly created image containing your application and its dependencies (among other images that you might have).

Notice though that the base for our image also got pulled from Docker Hub - microsoft/dotnet:1.0.1-sdk-projectjson.
Running a new container
Now that we built our image it’s time to run a new container based on that image.
docker run -d -p 8080:5000 -t aspnet-core-docker-azure
Let’s examine the arguments passed along the docker run command:
-
-d- the container will run indetachedmode, so we won’t see logs from the container as output -
-p 8080:5000- this will map the 5000 port inside the container (that the application is running on -
remember the Dockerfile) to port 8080 from the host
-
-t- the tag of the image this container is based on
This command started our container, so Docker must have executed dotnet run inside the container (remember the last line in the Dockerfile), so the application should have started.

The output of this command is the id of the newly created container, so we can verify that the container is running using the docker ps command:

We can see the id of the container, the image it is based on, the command used as entrypoint and the port mapping: 8080 on the host to 5000 inside the container.
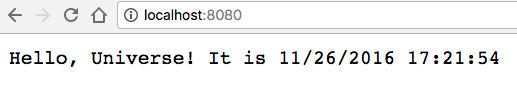
So if we navigate to http://localhost:8080 we should see our application running:
So far we created a very simple ASP .NET Core application and we ran it locally inside Docker.We haven’t used the GitHub repo, Docker Hub, Docker Cloud or Azure just yet. This is where we start doing so.
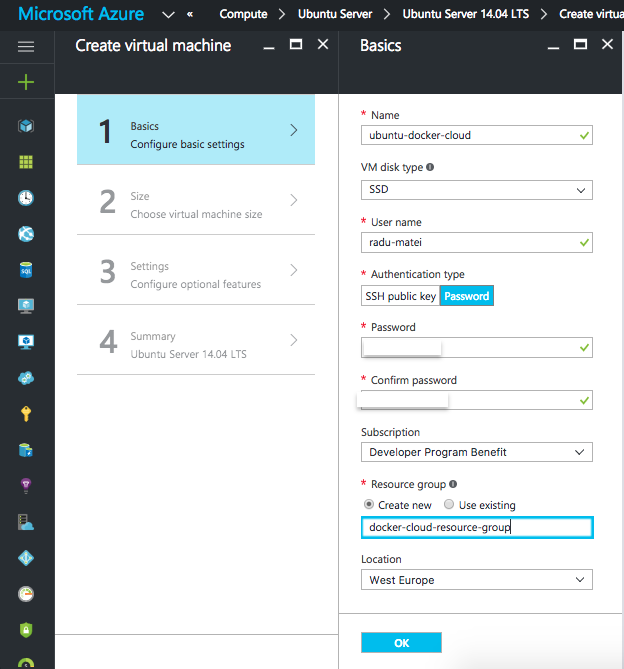
Setup an Azure VM as node for Docker Cloud
While Docker Cloud allows you to run containers and build images on some free tier servers, you would most likely want to do it on your own machine.
If you link the Docker Cloud account with your cloud subscription (in this case Azure), you can create nodes and clusters directly from the Docker Cloud portal.
In this case we will normally create a VM from the Azure Portal (or from any other cloud provider or on-premise) and install the Docker Cloud agent.
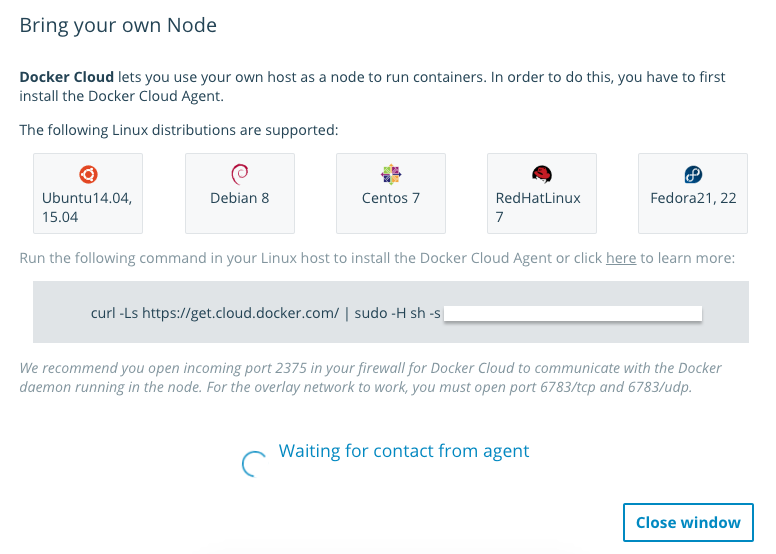
I created an Ubuntu Server 14.04 VM (at the moment of writing this article, only Ubuntu 14.04 and 15.04 are supported by Docker Cloud).
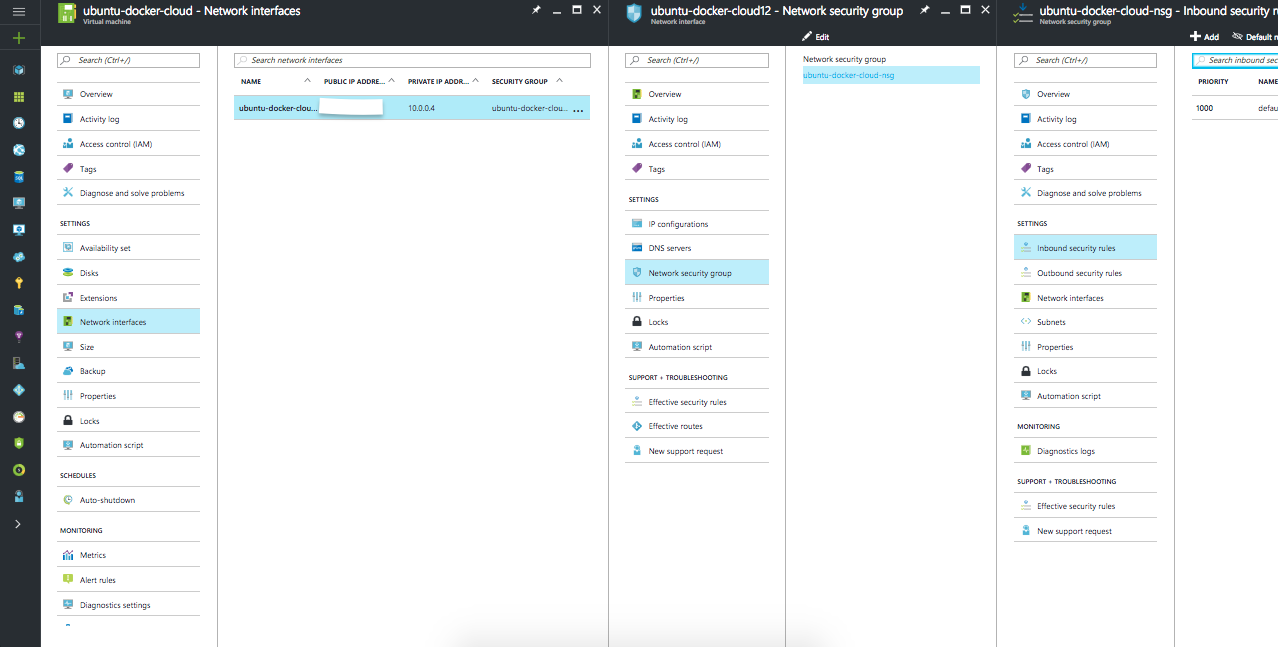
After the deployment succeeds, we will need to open some ports on that VM so the Docker Cloud self discovery service can work. In this article you can see the detailed process on how to open ports for Azure VMs.
We recommend you open incoming port 2375 in your firewall for Docker Cloud to communicate with the Docker daemon running in the node. For the overlay network to work, you must open port 6783/tcp and 6783/udp.
You have to find the Network Security Group tab from the VM settings, then the Network Security Group tab then the Inbound Security Rules tab.
As the Docker Cloud documentation states, we should open ports 2375 and 6783/tcp and udp.
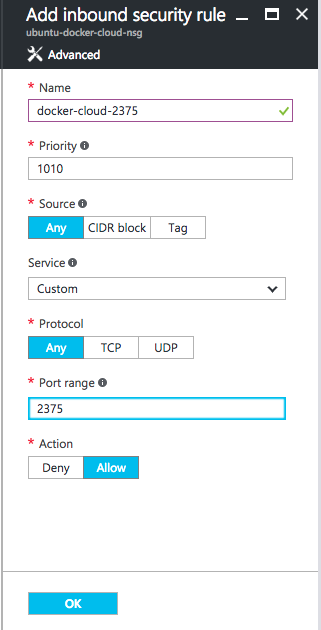
Then do the same for 6783/tcp and 6783/udp, and since this VM will host the running container, I will also open a port for HTTP - which will automatically open port 80.
If you plan to run multiple containers at the same time that expose ports on this machine, you should open more ports to be accessible from outside the VM.
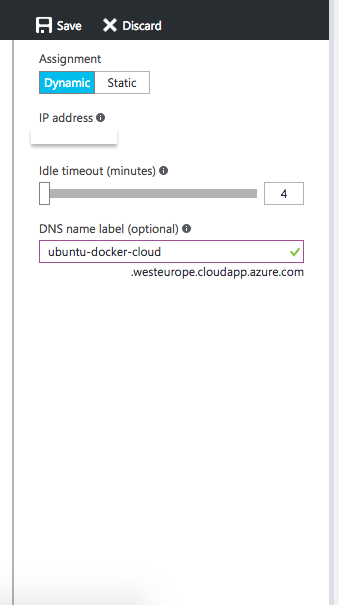
I will also setup a DNS name for the VM so that I don’t have to remember the IP of the machine:
At this point, you should be able to SSH into the machine and install the Docker Cloud agent.
On macOS, Linux or Bash on Windows, to SSH into a machine:
ssh user-name@your-machine-dns-or-ip
In my case, I would run
ssh [email protected]
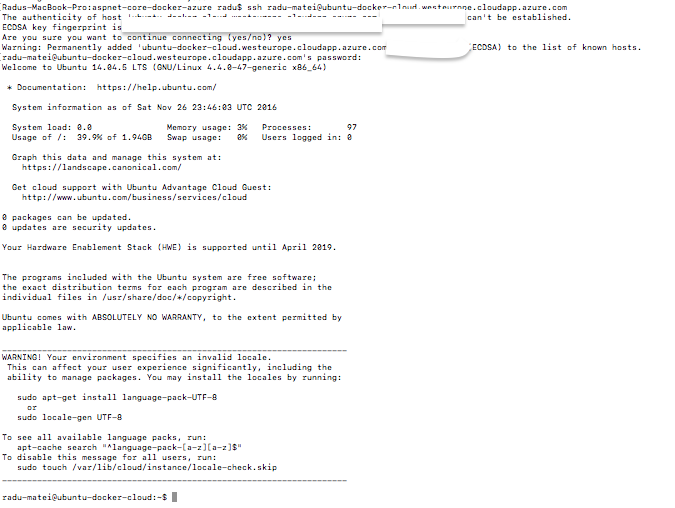
After this, I could just paste the command that installs the Docker Cloud agent:
curl -Ls https://get.cloud.docker.com/ | sudo -H sh -s your-unique-hash
You might still see some Tutum references in the scripts, as this was the name of the company acquired by Docker that initially developed the functionality behind Docker Cloud.
After the command above successfully executed and you refreshed your Docker Cloud tab, you should see your newly created node.
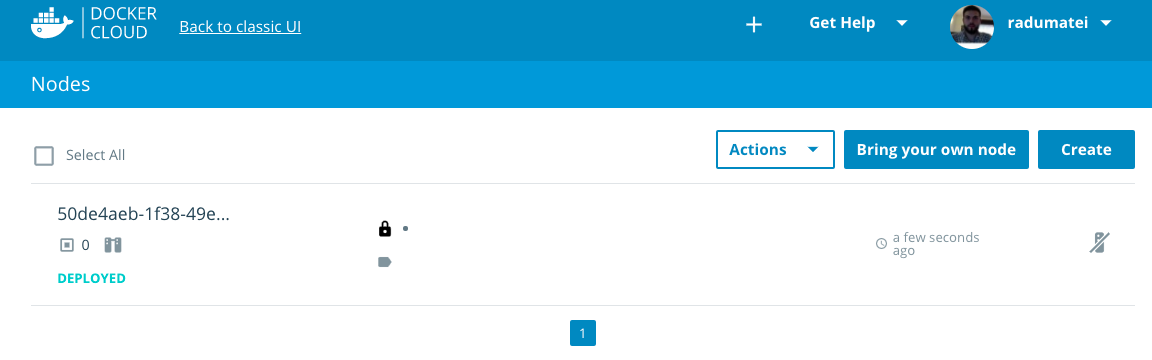
This is all the required setup for a VM to be a Docker Cloud node.
Creating a repository in Docker Cloud
By now, the GitHub repository with the application should be up to date, since we will use it to create a new Docker Cloud repository that will automatically build images on every git push in the GitHub repo.
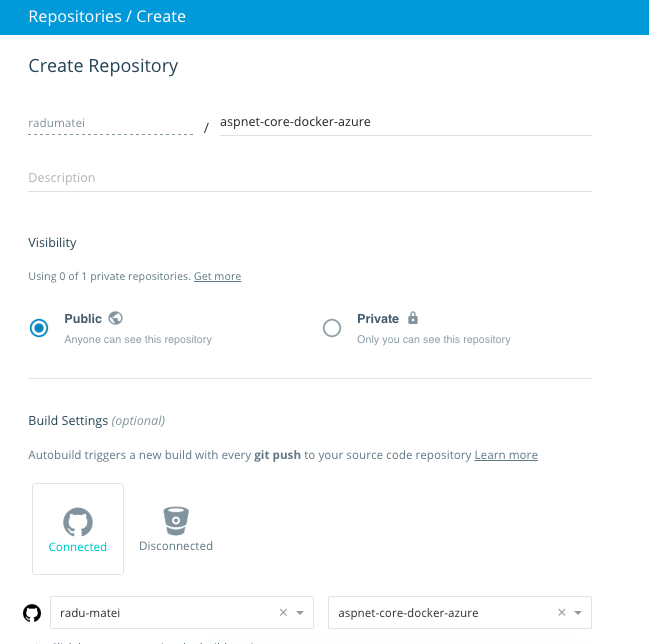
By default, the webhook will be setup for the master branch on every push, but you can also set it up for specific events, like certain releases.
By default, the newly created image will be public, but you can make it private. Note that you have a limited number of private repositories in the free tier.
After it was created and Docker Cloud successfully tested the connection with GitHub, we should set the build process so that it uses the node we just provided and not the shared one provided by Docker Cloud:

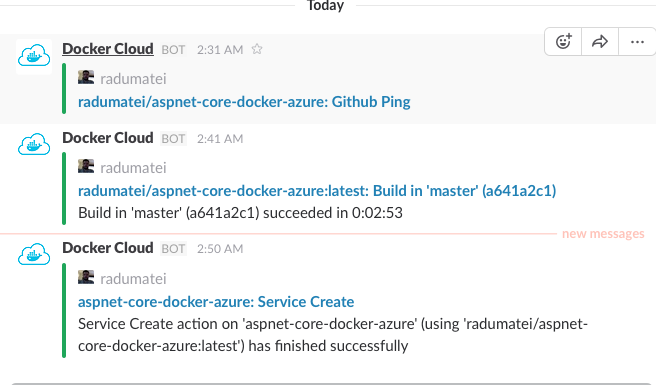
If you configured automated notifications on Slack, every time there is an event related to the service you are creating, you will have notifications on Slack.
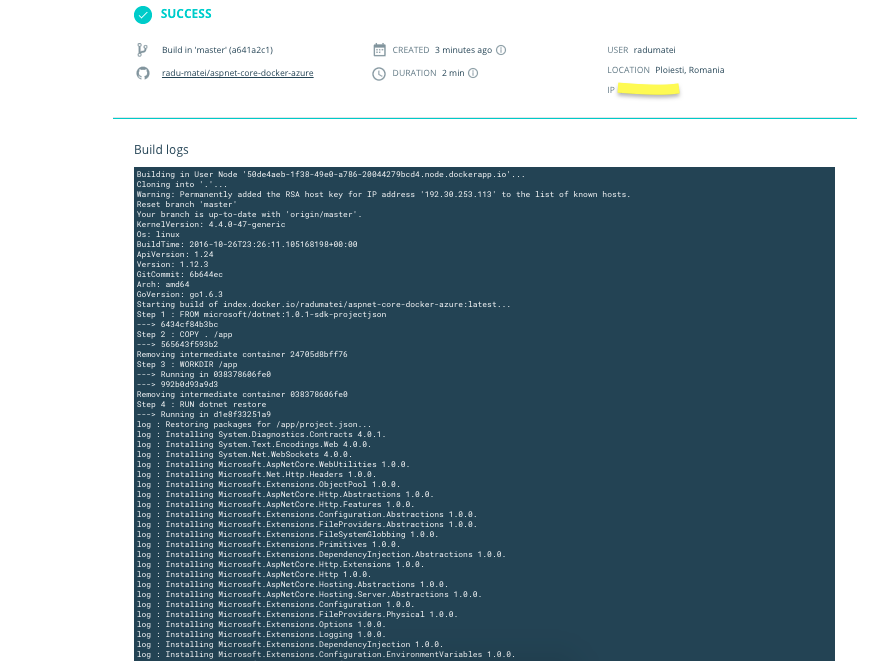
After you click Save and Build the image building will start on the machine you provided.
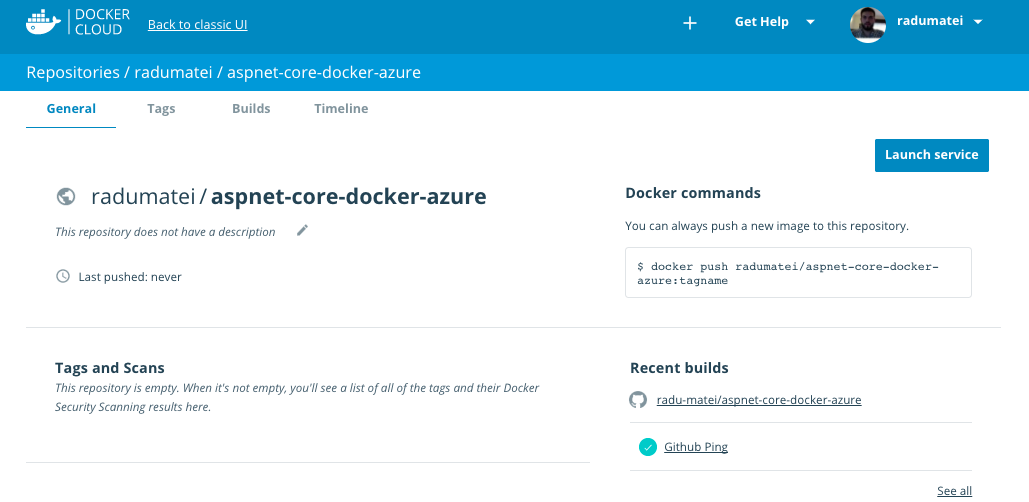
At any time you can see the logs from building the image in the Builds tab.
Now if you go to Docker Hub you should see your newly created image.
Creating a service based on the image we created
A service is a group of containers of the same image:tag. Services make it simple to scale your application. With Docker Cloud, you simply drag a slider to change the number of containers in a service.
Before you can deploy a service in Docker Cloud, you must have at least one node deployed. If you haven’t done this yet follow the tutorial to deploy a node .
When you create a service in the Docker Cloud web interface, a wizard walks you through configuring the service in three steps.
- Choose a Container Image Images can come from Docker Cloud’s Jumpstarts library, your personal Docker Hub account or Docker Hub’s public index, or from third party registries you connect.
- Configure the Service From here, give the service a name, set the initial number of containers, expose/publish ports, modify the run command or entrypoint, set memory and CPU limits.
- Set Environment variables Set the edit environment variables and link your service to other existing services in Docker Cloud.
More on Docker Cloud services on the Official Docker Documentation.
We will create a service based on the image we just created.
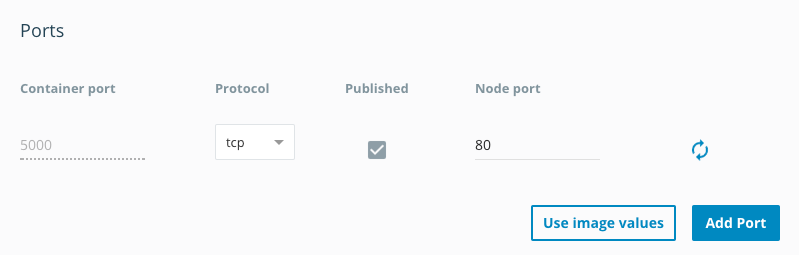
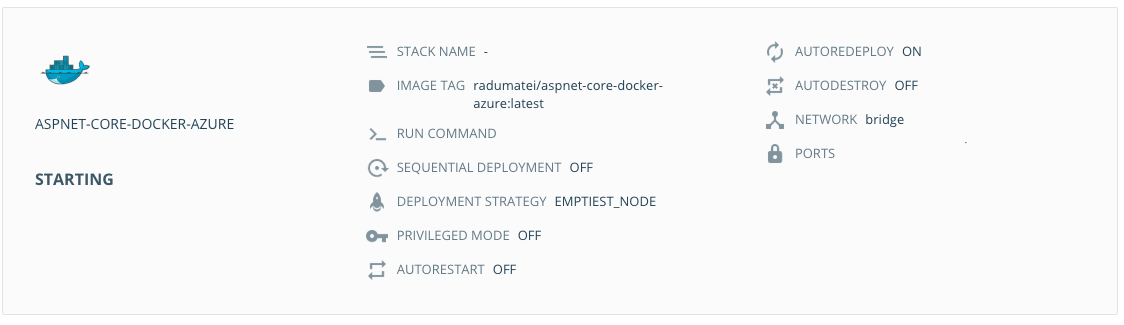
The only custom settings will be to enable the AUTOREDEPLOY option and to specify the port to be 80 on the machine.

After hitting the create, it will create the service and already start a container based on this service.
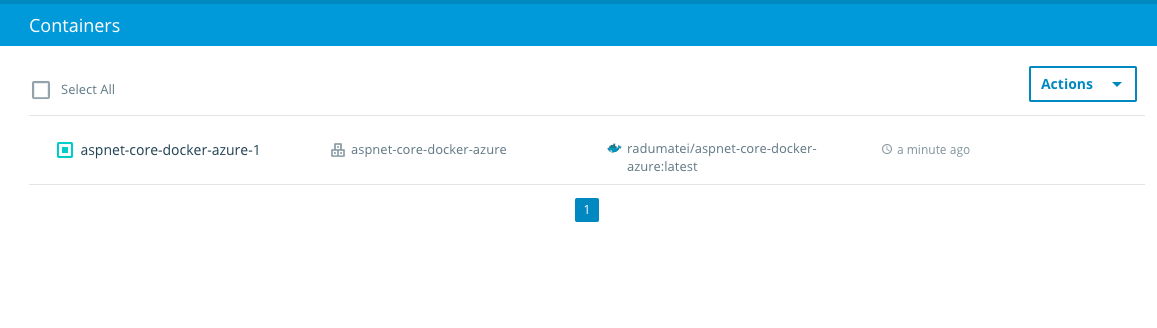
If we go to the containers tab, we can see the container running.
Testing the application
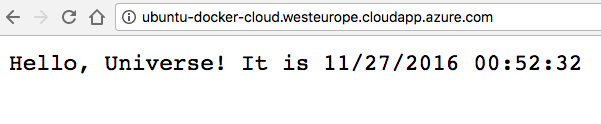
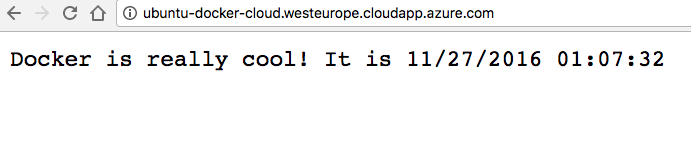
Remember the DNS we assigned to the Azure VM? In my case it was http://ubuntu-docker-cloud.westeurope.cloudapp.azure.com/. Normally, the container should have started on port 80 (the default HTTP port) on this machine.
Let’s try and access that exact URL:
At this point, you can create additional service and start containers on this machine, provided you open ports on the VM with the procedure described above.
Updating the application
Because we setup the image based on the GitHub repository and we checked the AUTOREDEPLOY option, every time we will push on the master branch of the repository, the entire system will update itself.
Let’s slightly modify the application and push the modifications. This should trigger the auto build and auto redeploy of the container and without us doing anything, the modifications should be live.
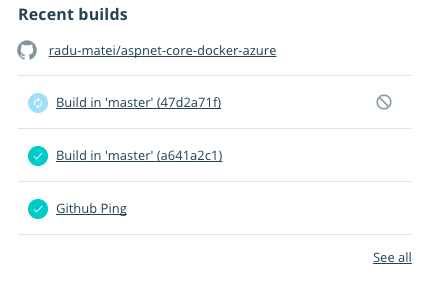
I just changed the message the application responds with and pushed the modifications to the master branch. This should trigger the build and redeploy of the container.
You should see the new build in the Recent Builds tab from the Repositories page:
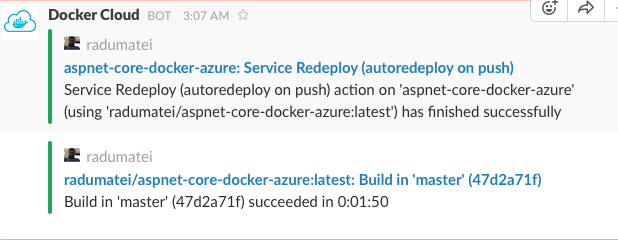
You can also see all events in Slack:
After the build and redeploy are successful, accessing the application should reflect the modifications:
Conclusion
This is basically how the entire process looks like. It is not production ready, as it does not have any testing workflow put in place and the application is rather simple.
Real world scenarios would most certainly involve more containers, so composing and orchestrating containers, as well as testing.
We will try to deal with these aspects in future articles, but for now we created a very simple CI/CD workflow using GitHub, Docker Cloud and an Azure VM.