Get started with Helm and Draft for Kubernetes
In the previous tutorial I used Azure to provision the infrastructure required to run a Kubernetes cluster. If you don’t have an Azure subscription you can create a free account and get $200 for 12 months.
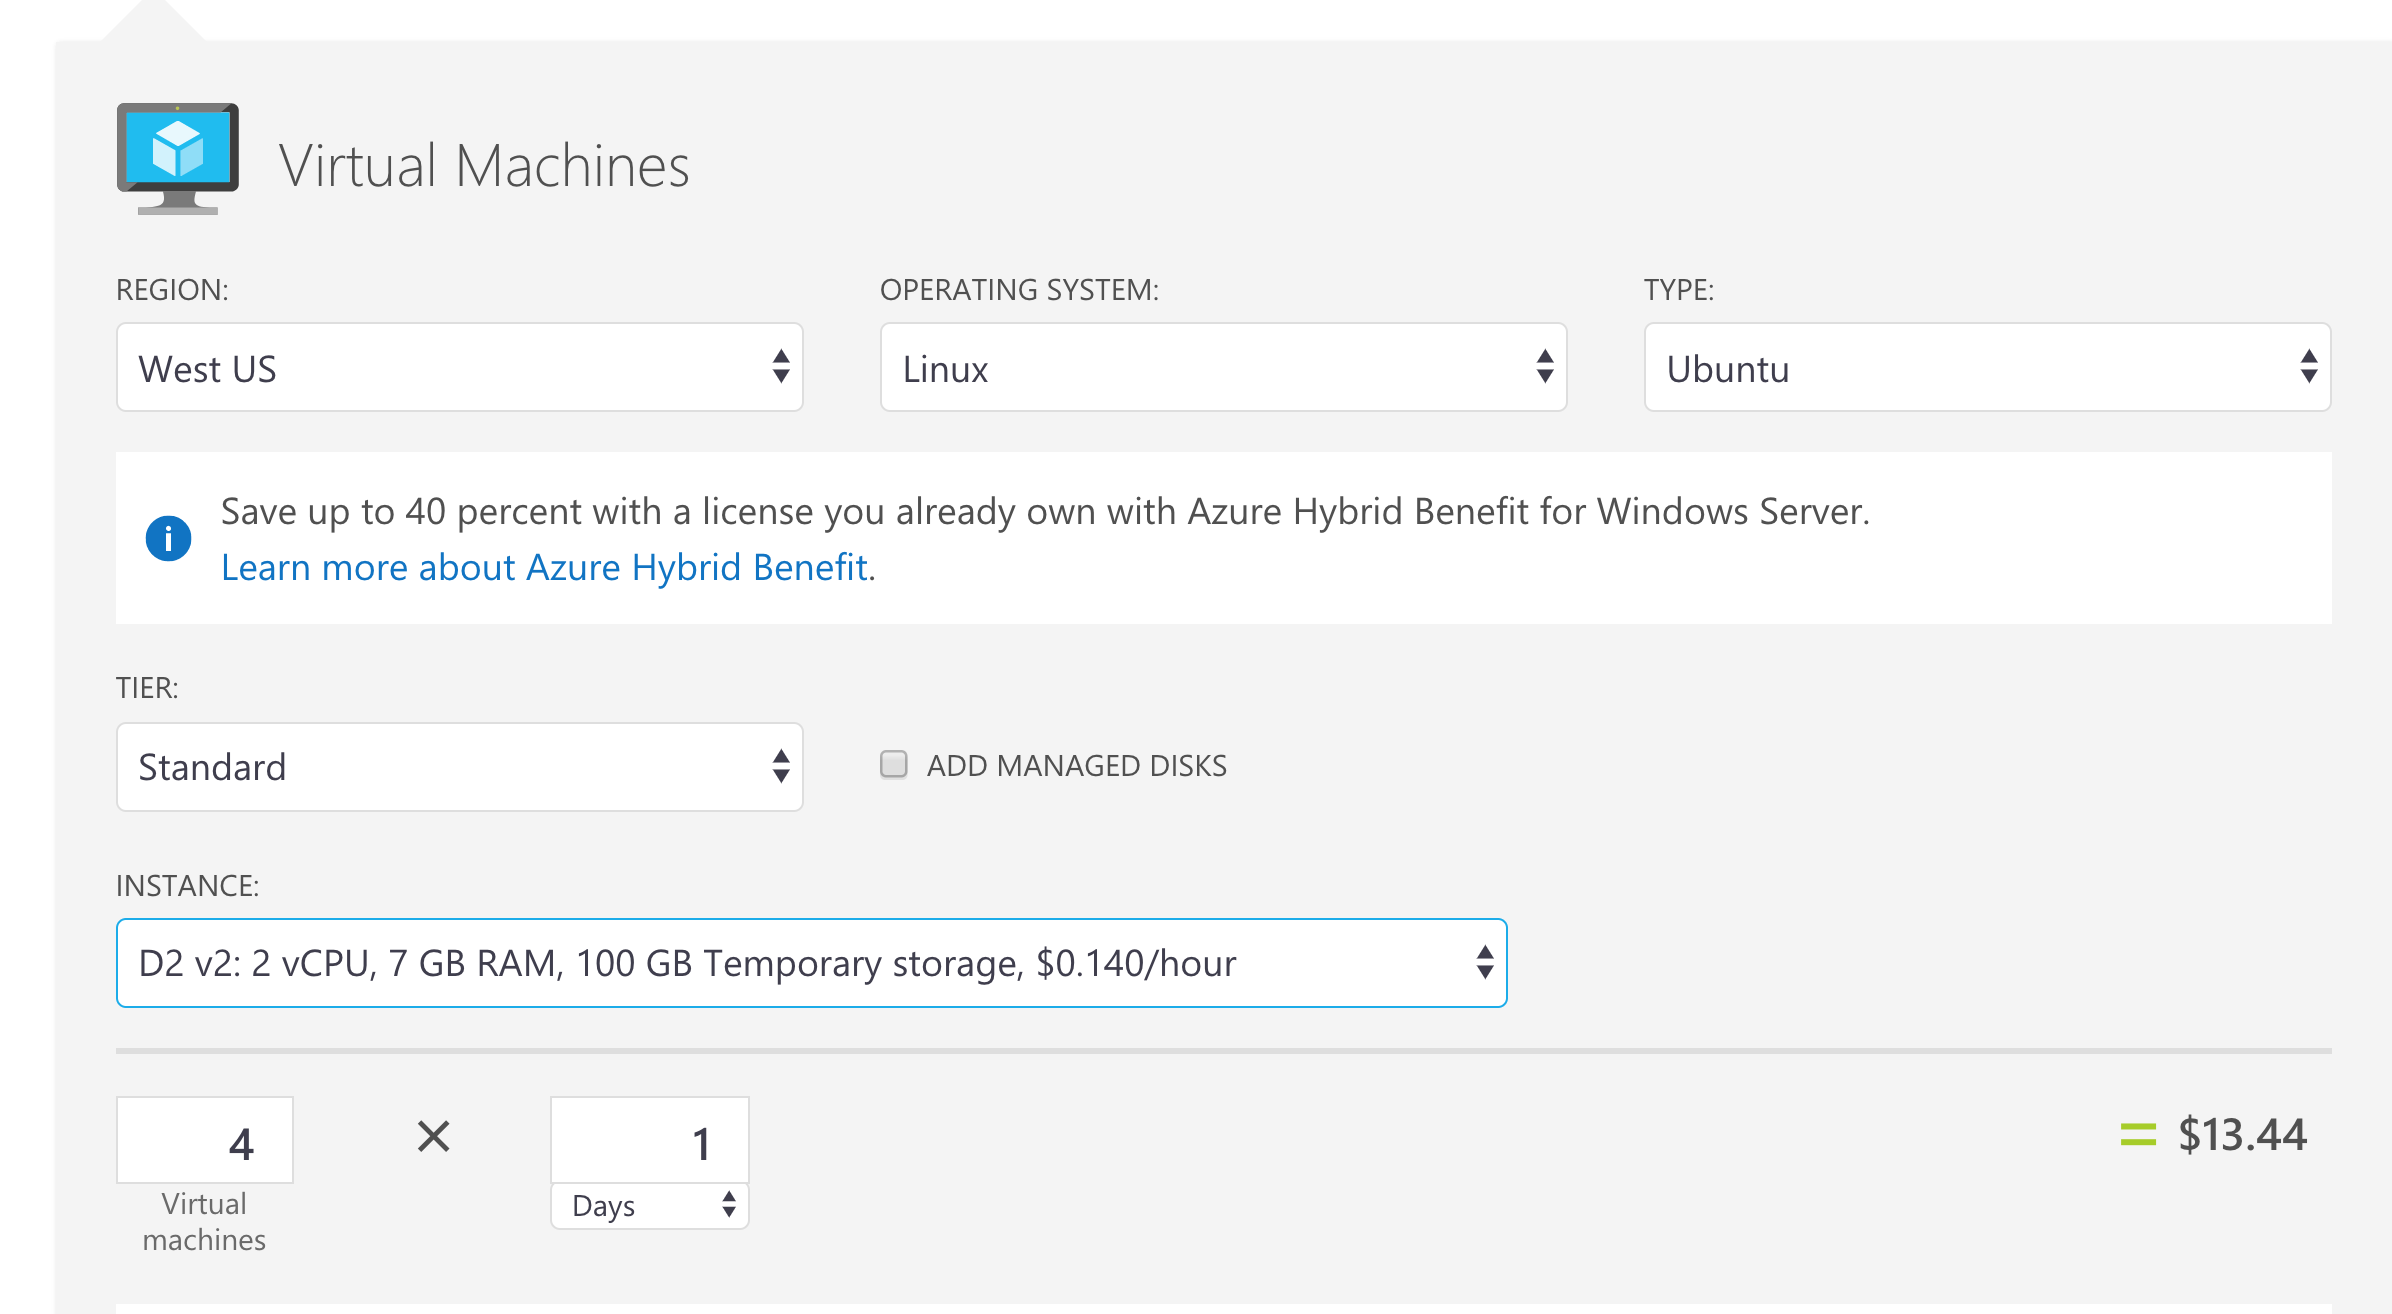
I deployed 4 D2_V2 VMs (1 master + 3 agents) with Linux and will cost approximately $13 - $14 / day, but you can change the type of the VM to be D1_V2 in the cluster definition, and the cost will go down to $6 / day.
Note that the pricing will vary slightly based on the location where you deploy the VMs.
Cost estimation created using the Azure Pricing Calculator
Introduction
In the previous post we saw how to deploy a Kubernetes 1.8 cluster on Azure using acs-engine and the Azure Cloud Shell. Now we will use that cluster to get started with Helm and Draft to simplify our development process.
In the next post we will see how to integrate Jenkins with Azure Container Instances in this process, so stay tuned :)
If you don’t have your
kubeconfigand SSH keys to your cluster and you deployed using the previous article, you might want to download the certificates and config files so you can access the cluster from outside the Azure Cloud Shell, as instructed in the previous article.
Using kubectl, helm and draft
Normally at this point you would manually download and install the latest version for kubectl, helm and draft. Luckily, you can use the Dockerfile below to create yourself an image that already has those installed.
You can find the repository on GitHub here and the image on Docker Hub.
Please note that at the time of writing this article, the latest versions are:
v1.8.0forkubectl,v2.6.2forhelmandv0.7.0fordraft.
When a new version is available, simply change the environment variable in the Dockerfile and build again.
One reason for this is that I regularly work with multiple clusters, and all of these commands create their config in the home directory. Not once it happened that I overwrote the config (for kubectl, helm or draft). I really think this is cleaner approach - you have a folder for your cluster with all its config there. Another cluster, simply another folder.
Then, you use the config from within a container.
The image simply installs kubectl, helm and draft and exposes a port inside the container (so we can easily kubectl proxy a bit later).
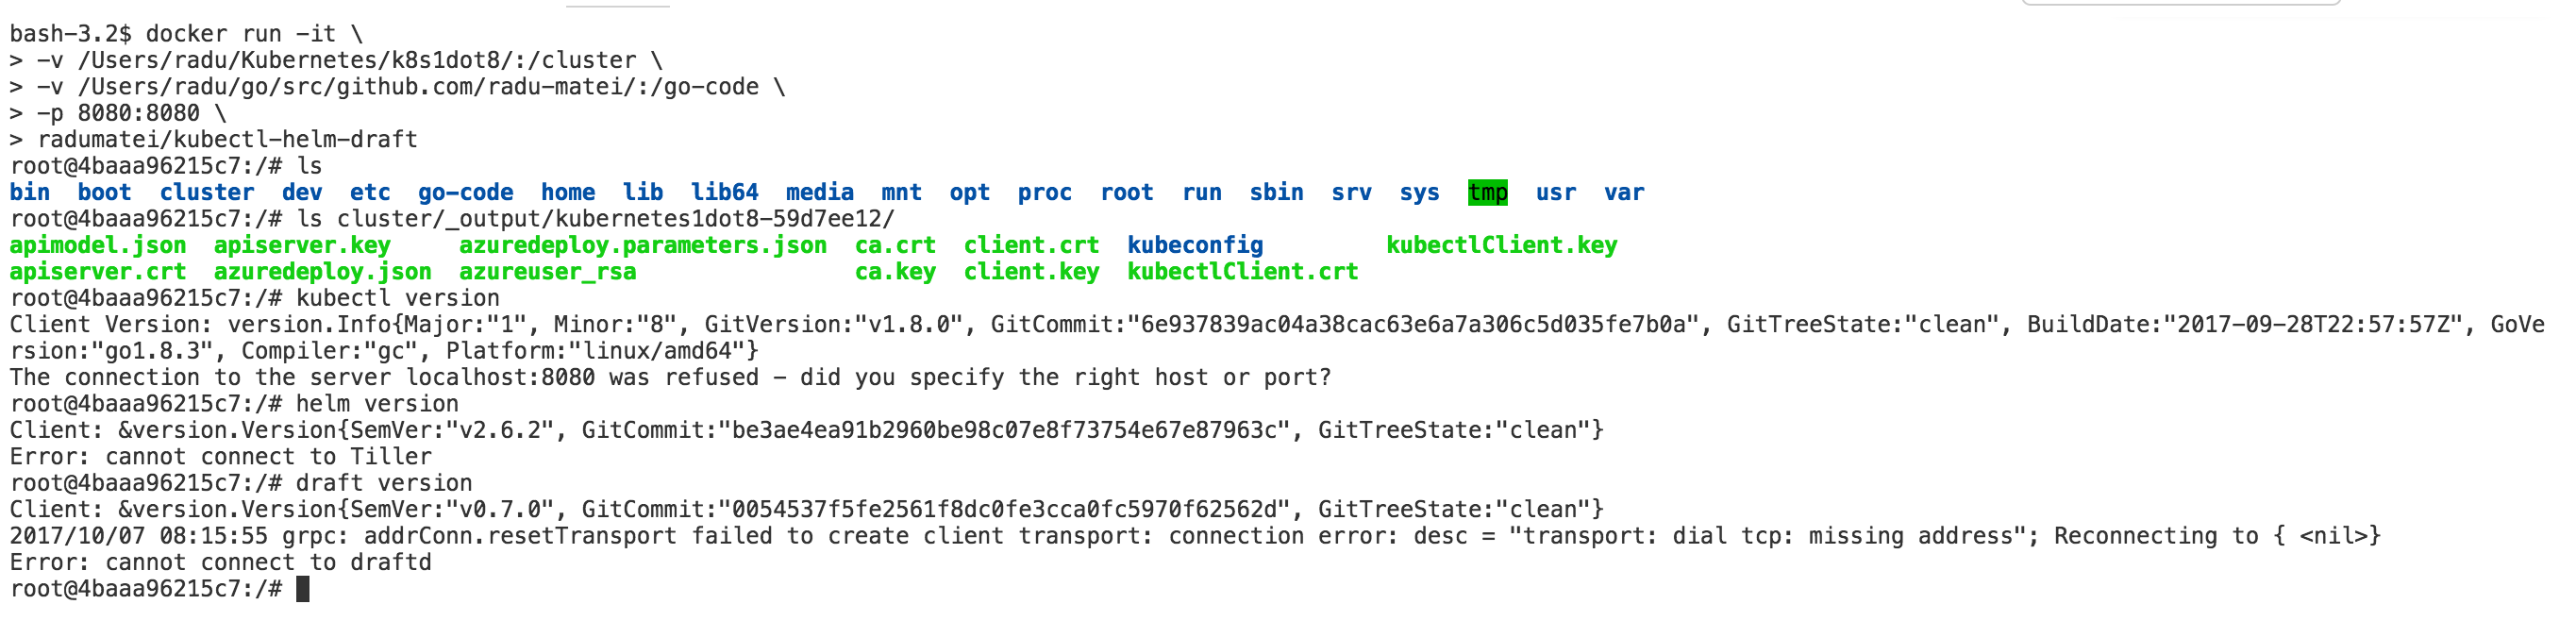
Now all you need to do is run a container based on the image you just built, and mount the cluster access certificates folder so we can point kubectl at.
If you don’t know where those certificates came from, check out this article and modify the path to match your own.
I also mounted a local directory so I can later create an application from outside the container and exposed port 8080 (you can choose another one) to access the dashboard.
Of course, neither helm, nor draft will be able to connect to the cluster, as their server-side components (tiller and draftd) are not configured yet.
Now simply point kubectl to your kubeconfig file (in my case in the _output folder from acs-engine, but can be from anywhere) and you have yourself a container with the latest tools for Kubernetes, connected to a cluster running the latest version of Kubernetes.

Configure Helm
Helm is a tool that streamlines installing and managing Kubernetes applications. Think of it like apt/yum/homebrew for Kubernetes.
Helm has two parts: a client (helm) and a server (tiller)
Tiller runs inside of your Kubernetes cluster, and manages releases (installations) of your charts.
Helm runs on your laptop, CI/CD, or wherever you want it to run.
Charts are Helm packages that contain at least two things:
- A description of the package (Chart.yaml)
- One or more templates, which contain Kubernetes manifest files
Charts can be stored on disk, or fetched from remote chart repositories (like Debian or RedHat packages)
More on the GitHub repo for Helm
We now need to initialize helm. Since we are in a container, once we exit all config files written by helm and draft will be lost. That’s why we have the cluster directory, which is mounted from the host.
We will now need to point helm to write its config in /cluster and run helm init:
export HELM_HOME=/cluster/ and helm init.
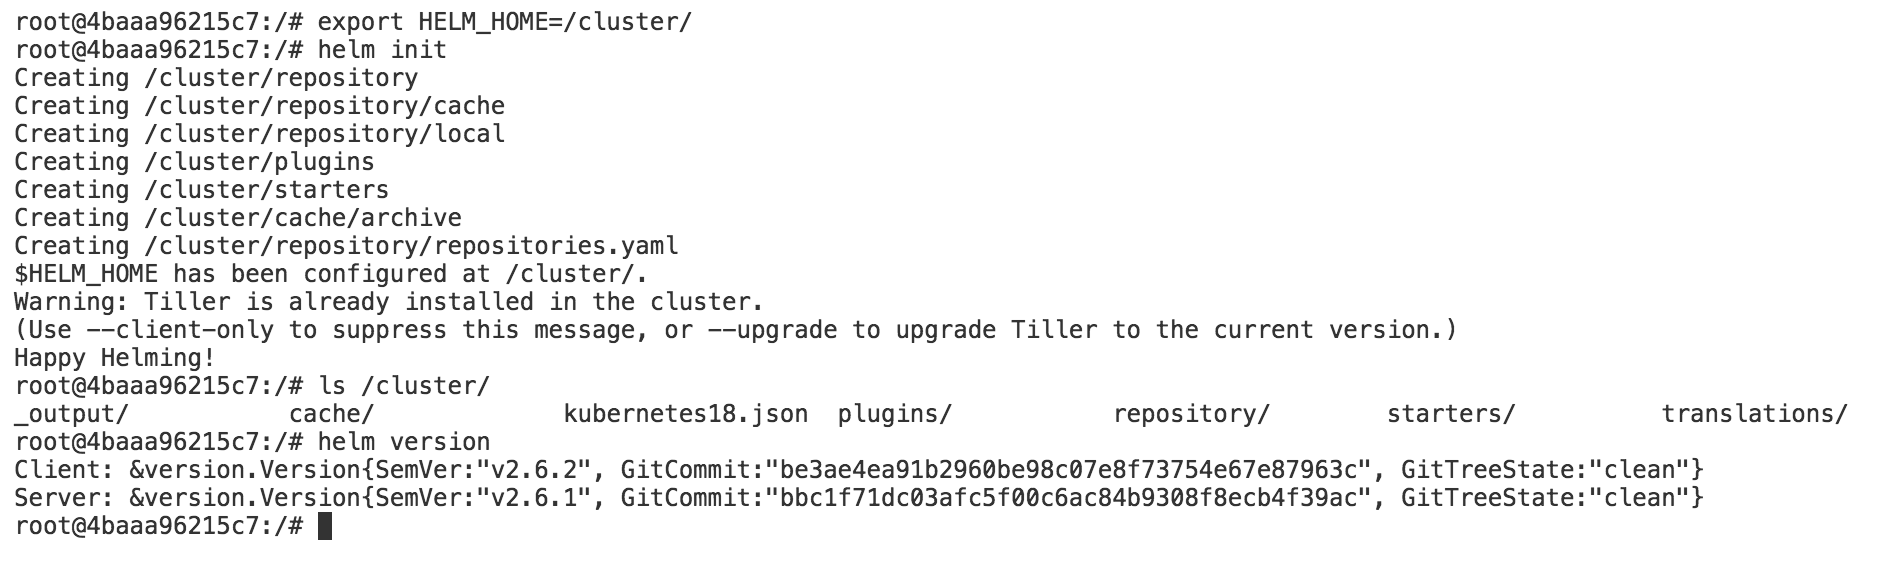
Please note that the default server version of
tiller(thehelmserver-side component) is at versionv2.6.1. You can easily upgrade it usinghelm init --upgrade

We now have configured helm:
Configure Draft
Draft makes it easy to build applications that run on Kubernetes. Draft targets the “inner loop” of a developer’s workflow: as they hack on code, but before code is committed to version control.
Using Draft is as simple as:
draft createto containerize your application based on Draft packs
draft upto deploy your application to a Kubernetes dev sandbox, accessible via a public URL
Use a local editor to modify the application, with changes deployed to Kubernetes in seconds
Once the developer is happy with changes made via Draft, they commit and push to version control, after which a continuous integration (CI) system takes over. Draft builds upon Kubernetes Helm and the Kubernetes Chart format, making it easy to construct CI pipelines from Draft-enabled applications.
More on the GitHub repo for Draft
Now we are going to use a very cool feature of Draft called ingress. Basically, this will allow us to use a base domain - *.draft.yourdomain.com to expose your apps while testing. Of course, you will need to own a domain and to be able to create a wildcard A Record pointing back to an nginx controller in your cluster.
You will use helm to deploy an nginx ingress controller with a public IP address (if you are on Azure or GKE this will be done automatically for you after a couple of minutes):
helm install stable/nginx-ingress --namespace=kube-system --name=nginx-ingress

Note that the nginx ingress controller also deploys a default backend - this will be served as a default backend (pretty clear name there).
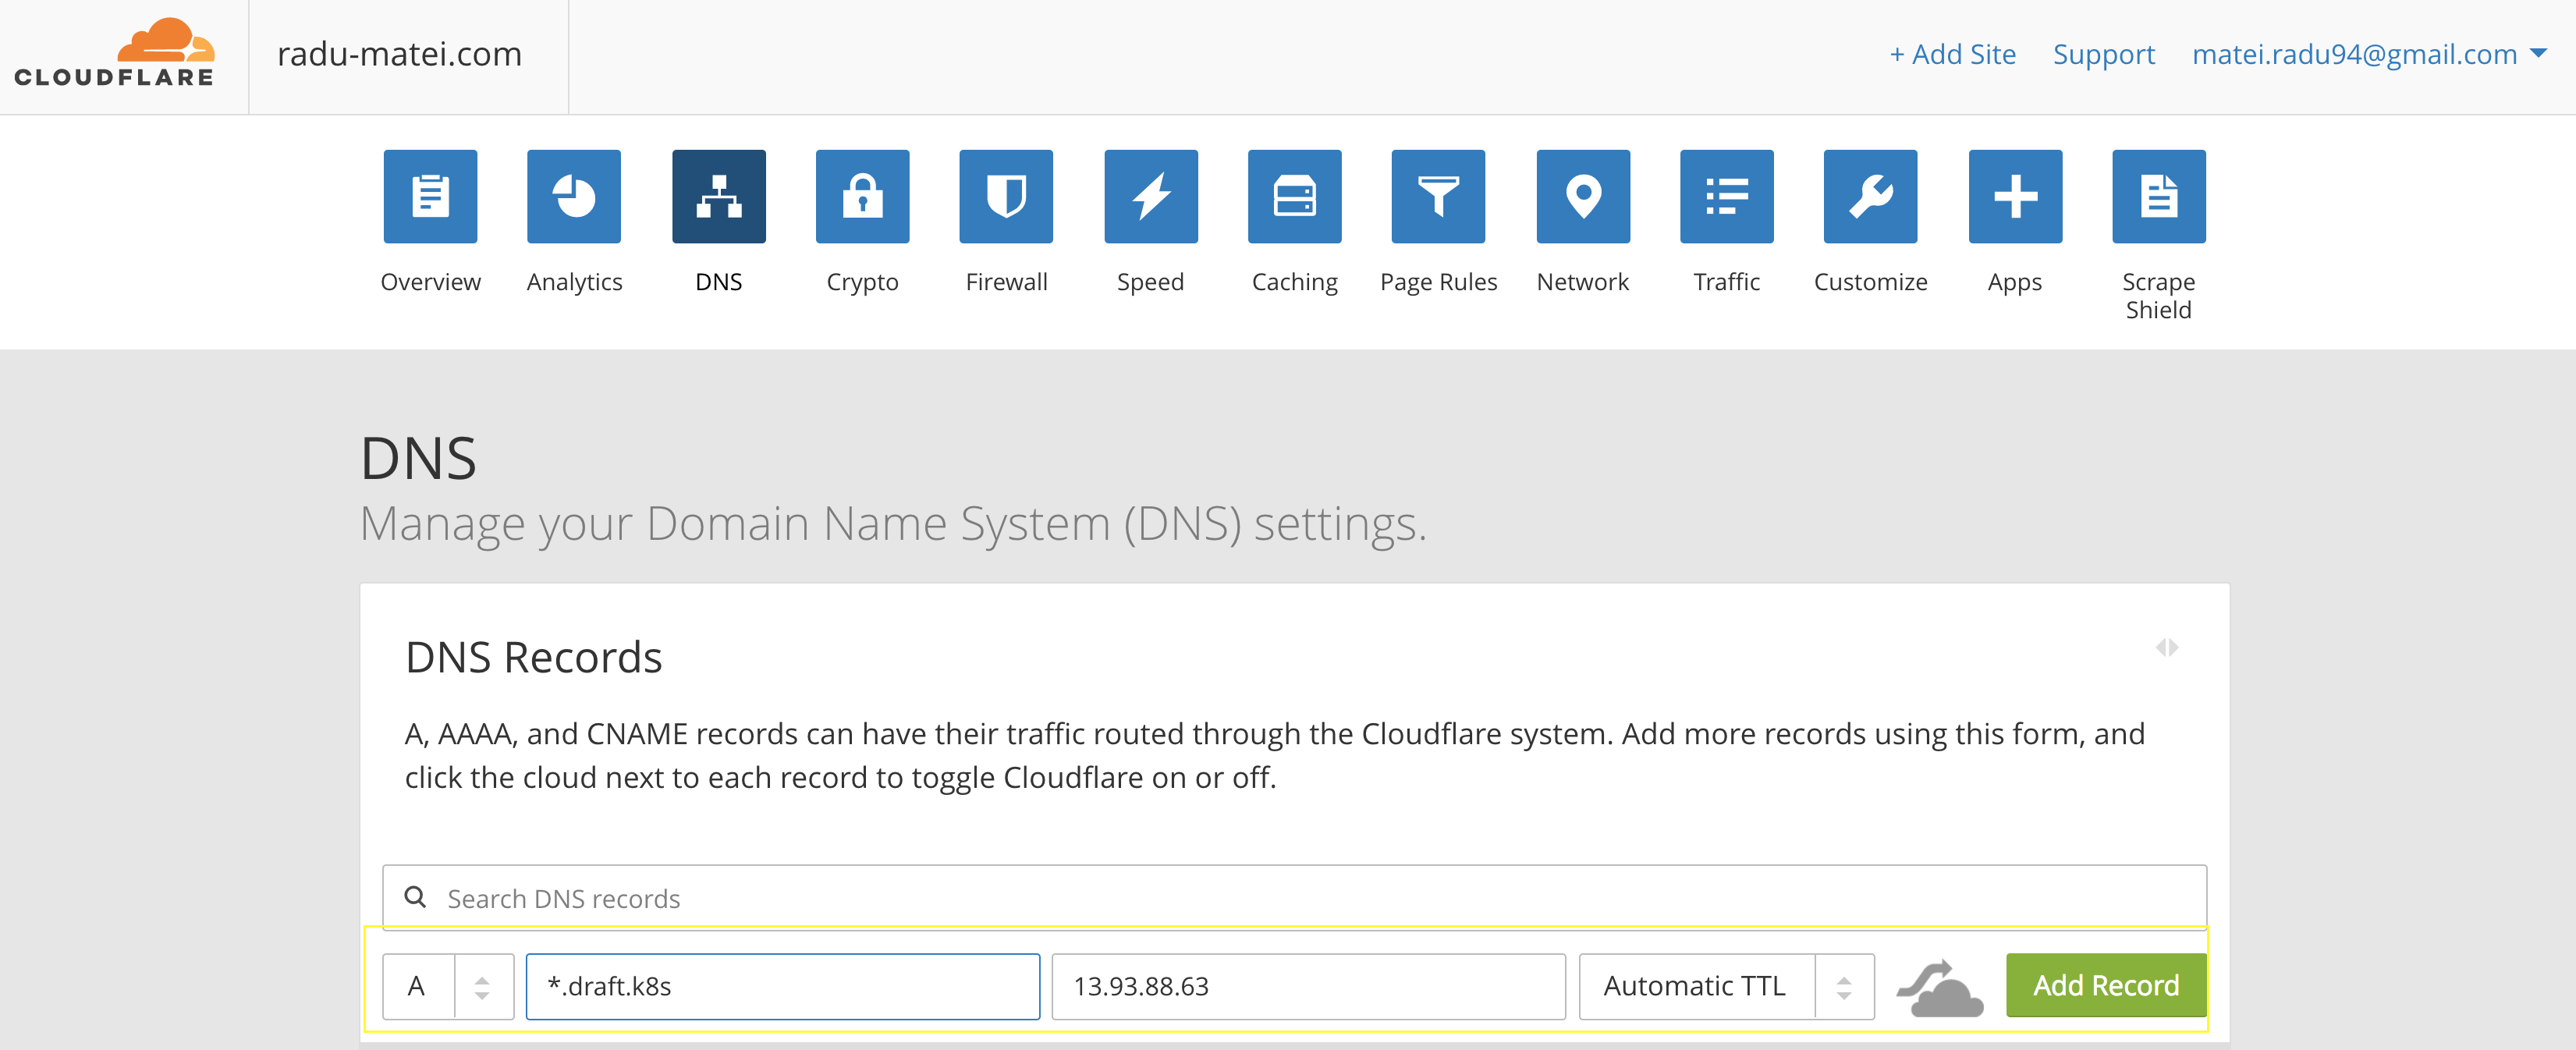
Now depending on where you manage your domain, you need to go and create the A Record with a wildcard pointing back to the IP address of your ingress controller.
In my case I manage my domain using CloudFlare, so the steps are pretty clear and straightforward:
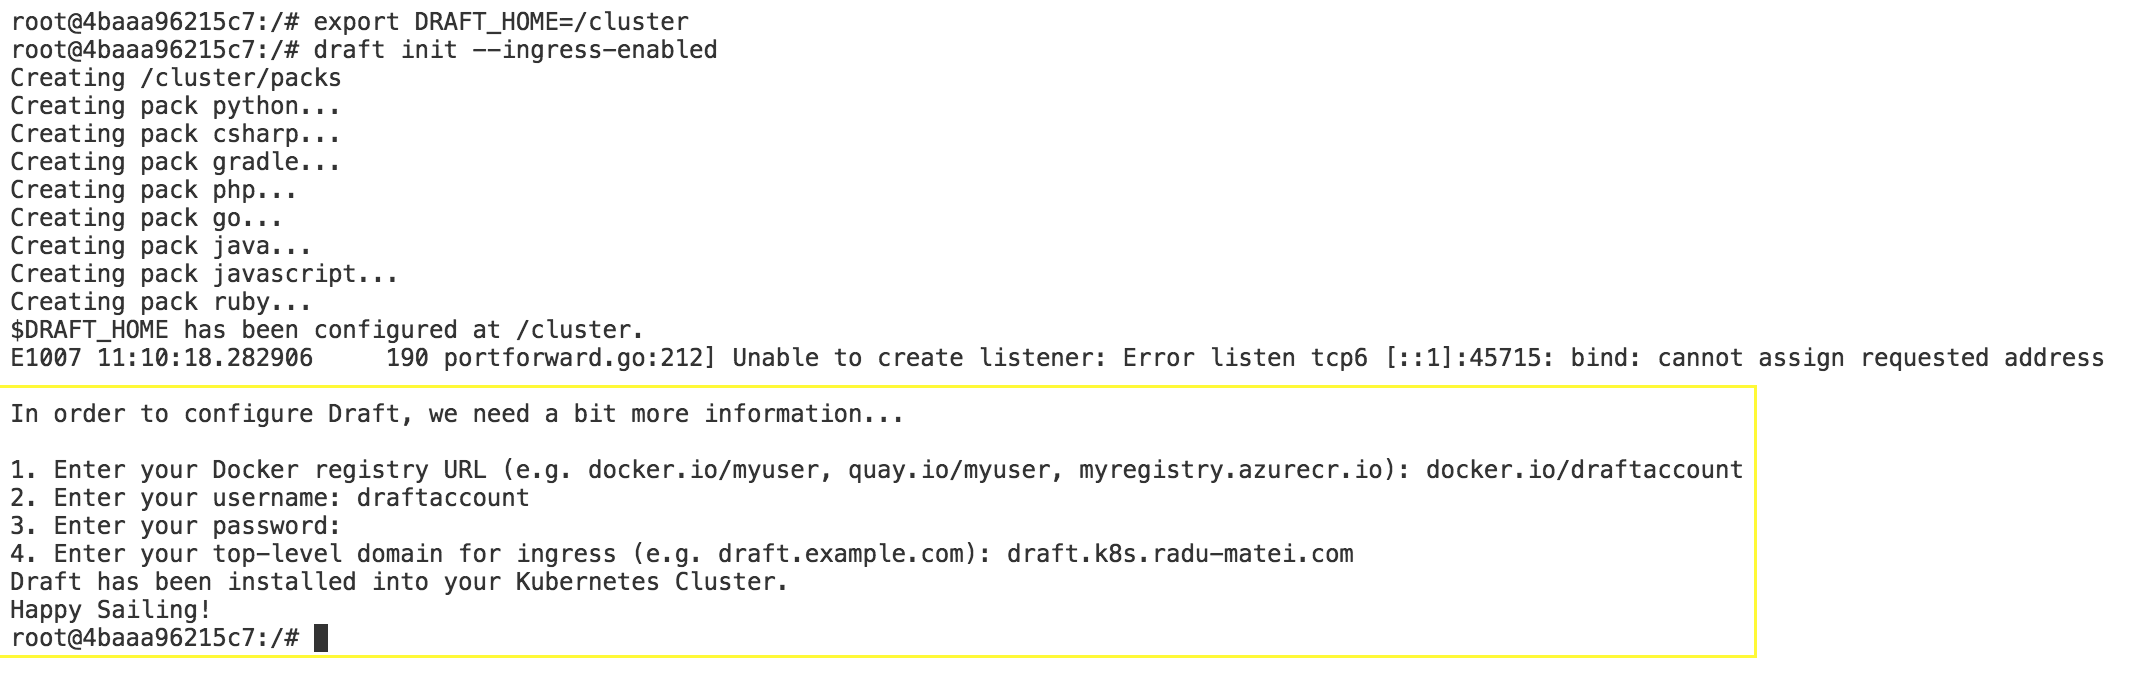
We will also point draft to write its config in /cluster: export DRAFT_HOME=/cluster and initialize draft, specifying it to also configure the ingress controller:
draft init --ingress-enabled
This will prompt you to enter your container registry credentials and the top level domain record you created.
Note that if you are using Docker Hub, the URL is: docker.io/username
Note that you need to specify the top level domain (without the wildcard, see image below)
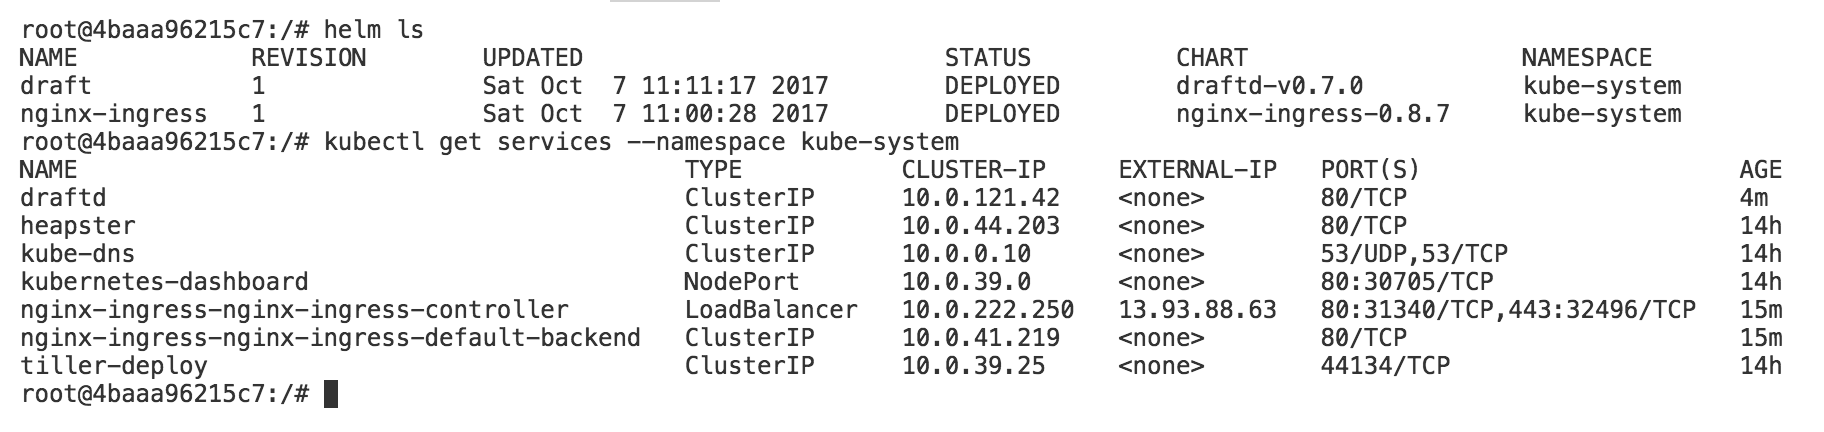
Now if we inspect our cluster we can see the draftd server, tiller and the ingress controller.
If you don’t manage a domain, please see the instructions here.
Creating an application
Remember earlier that we also mounted a local directory where we will write our application. This was to allow us to easily use VS Code to develop the application.
Now to the part where we actually create an application.
You can find a getting started guide at the GitHub repo for Draft.
Draft already has packs that can autodetect your application and deploy it to your cluster for you.
The packs are basically helm chart templates for various programming languages and frameworks, and you can easily write your own pack.
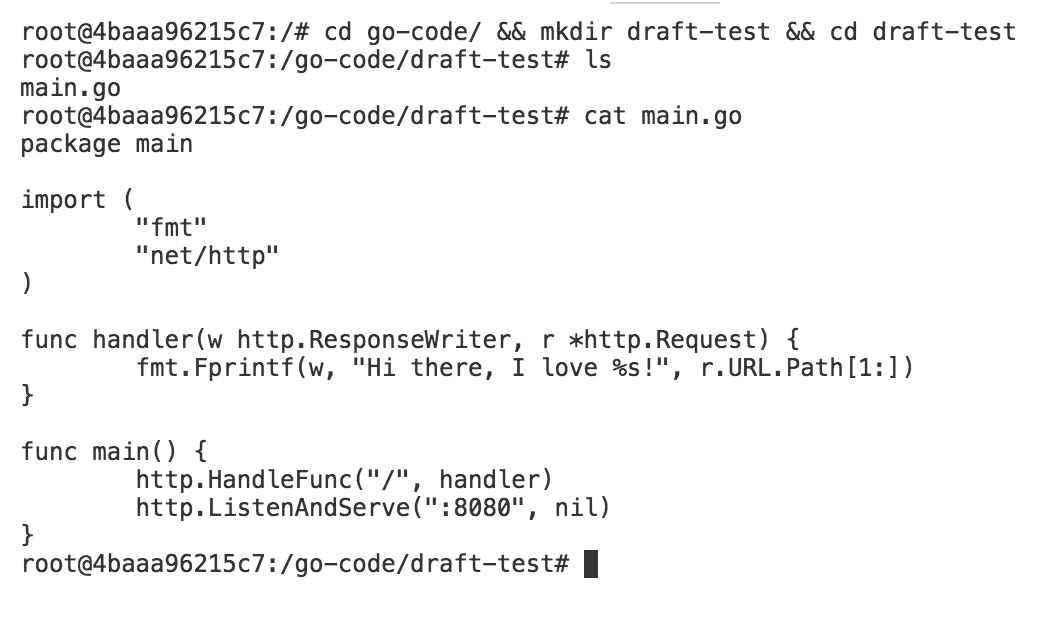
This is the application we will use, a very simple Go web app:
We will create a new app using draft by executing draft create --app <name-for-app>:

This command will detect the application language (that 6 digit certainty… :D) and create some new files for us: a Dockerfile, a draft.toml file and a Helm chart.
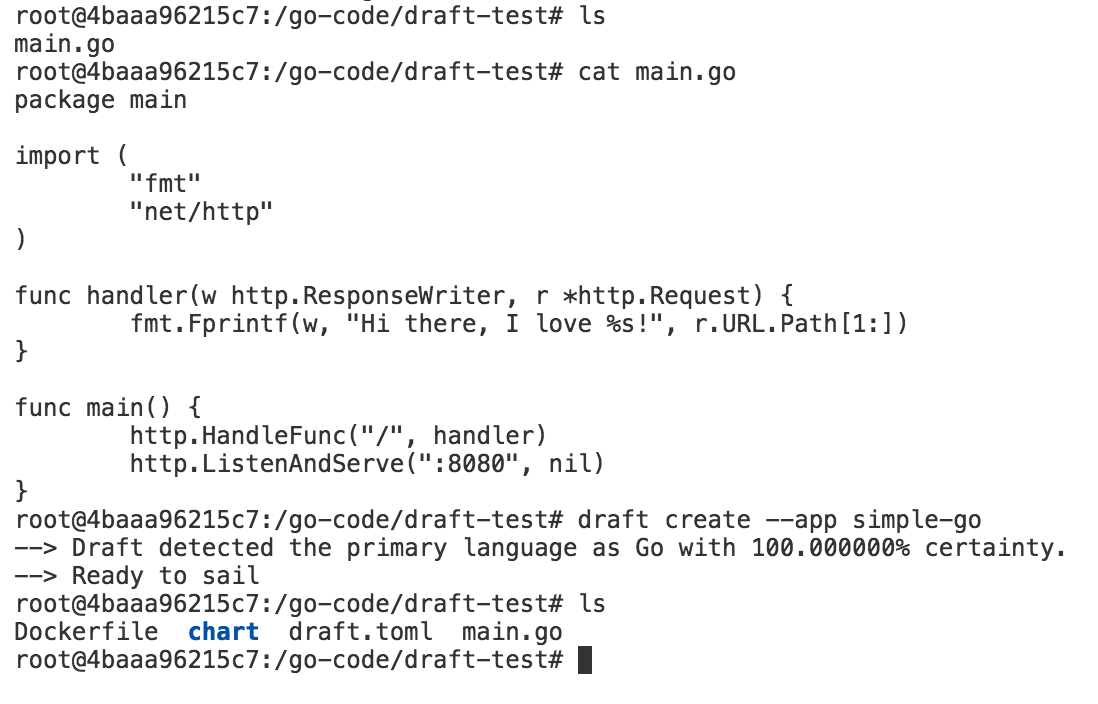
Taking a look at draft.toml, we can see that it will deploy a new app called simple-go (that’s how I named it, if you omit the name you will get a randomly generated name) on the default namespace.
If you change the watch property to true, it will also look for changes on your local filesystem and redeploy the app on every change:
[environments]
  [environments.development]
    name = "simple-go"
    namespace = "default"
    wait = false
    watch = true
    watch_delay = 2
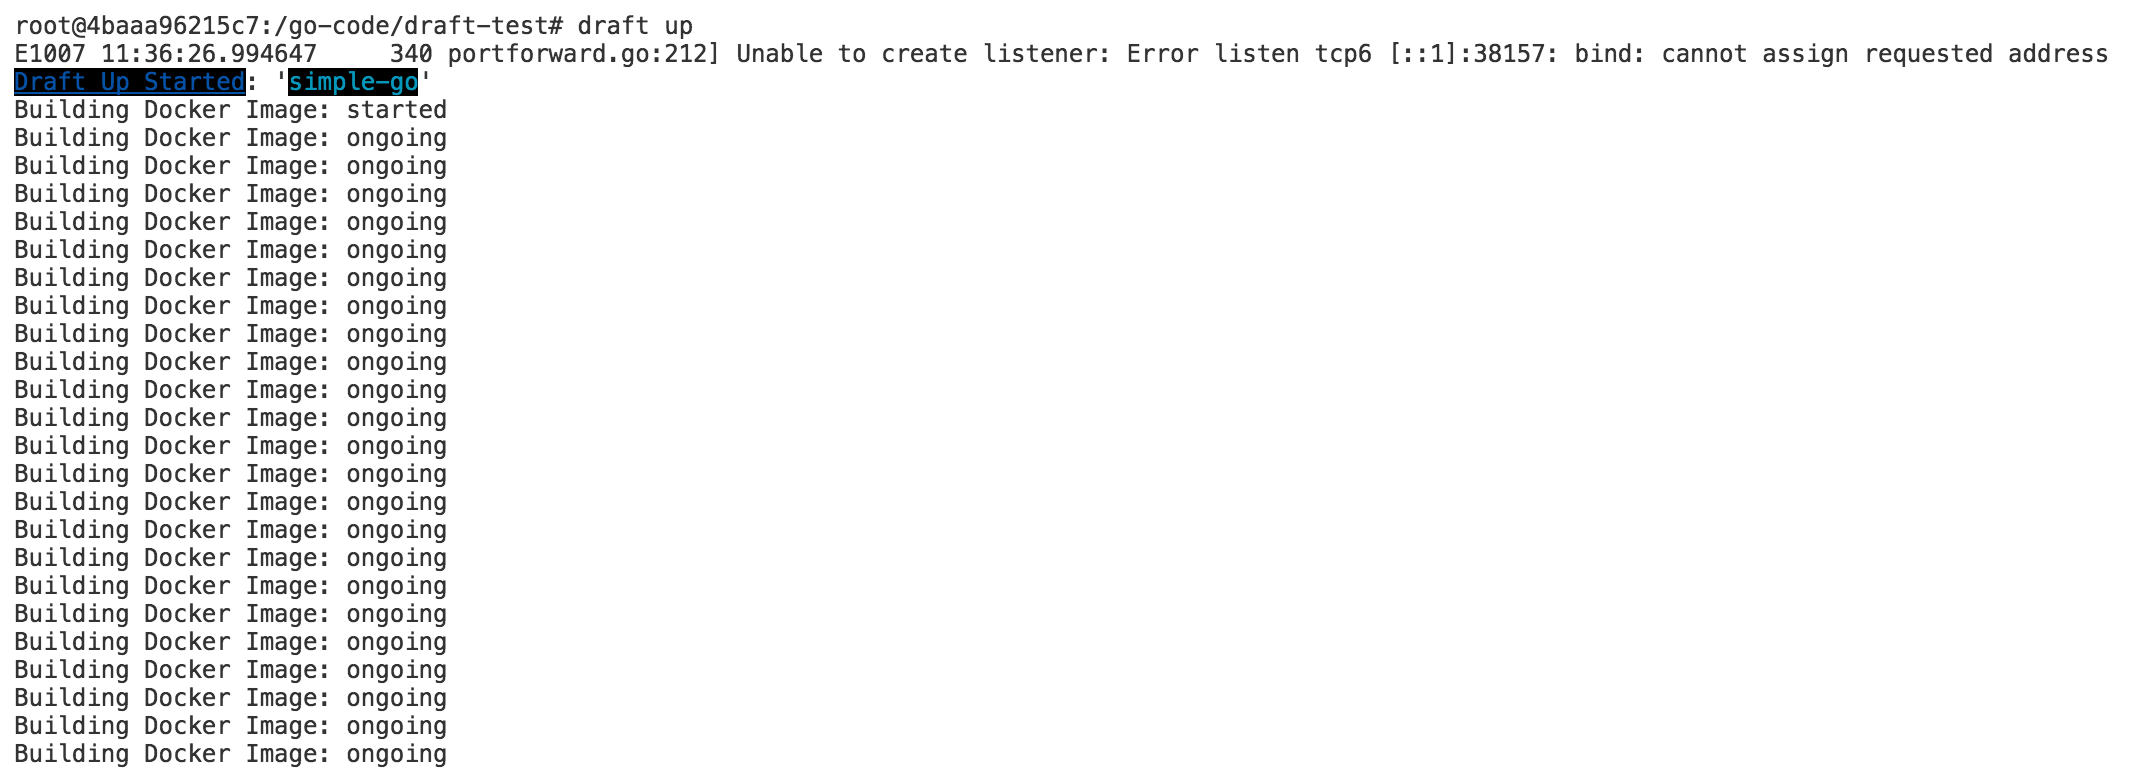
Executing draft up will automatically build the image and push it to the image repository.
Note that all the work is done inside a pod in your cluster! There is no docker build or docker push step executed locally.
Then there is the release step, which will install the Helm chart of your application on the cluster, also configuring the public endpoint of your application as: http:// draft-app-name.A-Record.yourdomain.com.
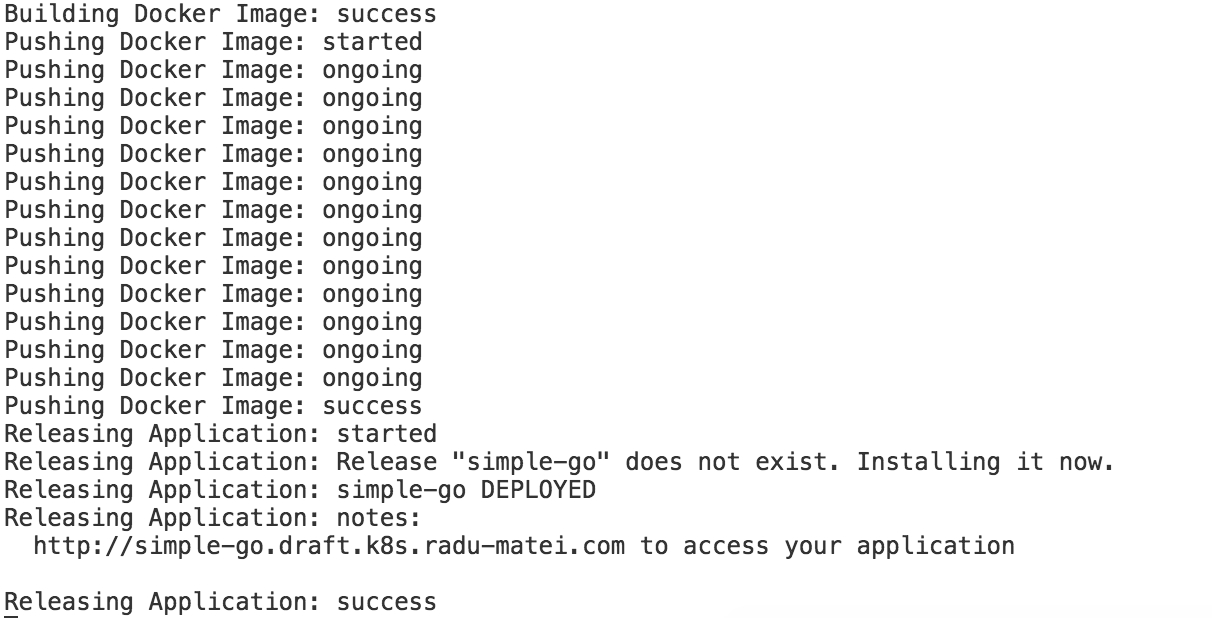
In my case, the public endpoint of my application will be: http://simple-go.draft.k8s.radu-matei.com :
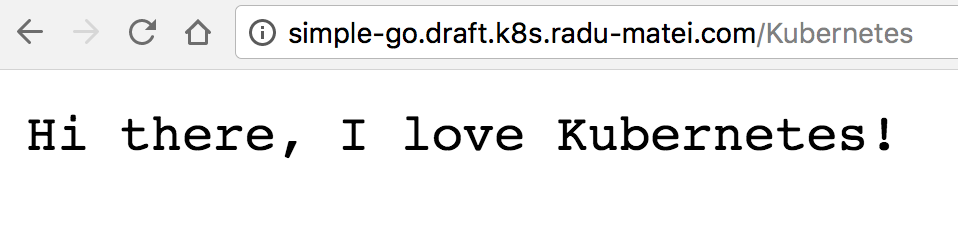
Note that for any update of your application (that is you modifying the app locally and saving it) while the draft up process is running, you will get the updated version of your application deployed automatically.
Investigating what actually happens
Remember that you also exposed port 8080 from the container? Now it’s time to start the proxy that will allow us to browse the Kubernetes dashboard locally:
kubectl proxy --port 8080 --address 0.0.0.0
Then, if you also exposed port 8080 on your host can access: http://localhost:8080/api/v1/namespaces/kube-system/services/kubernetes-dashboard/proxy/#!/node?namespace=_all
If you go to all your pods, you will see a pod called draftd-<some-random-id>:
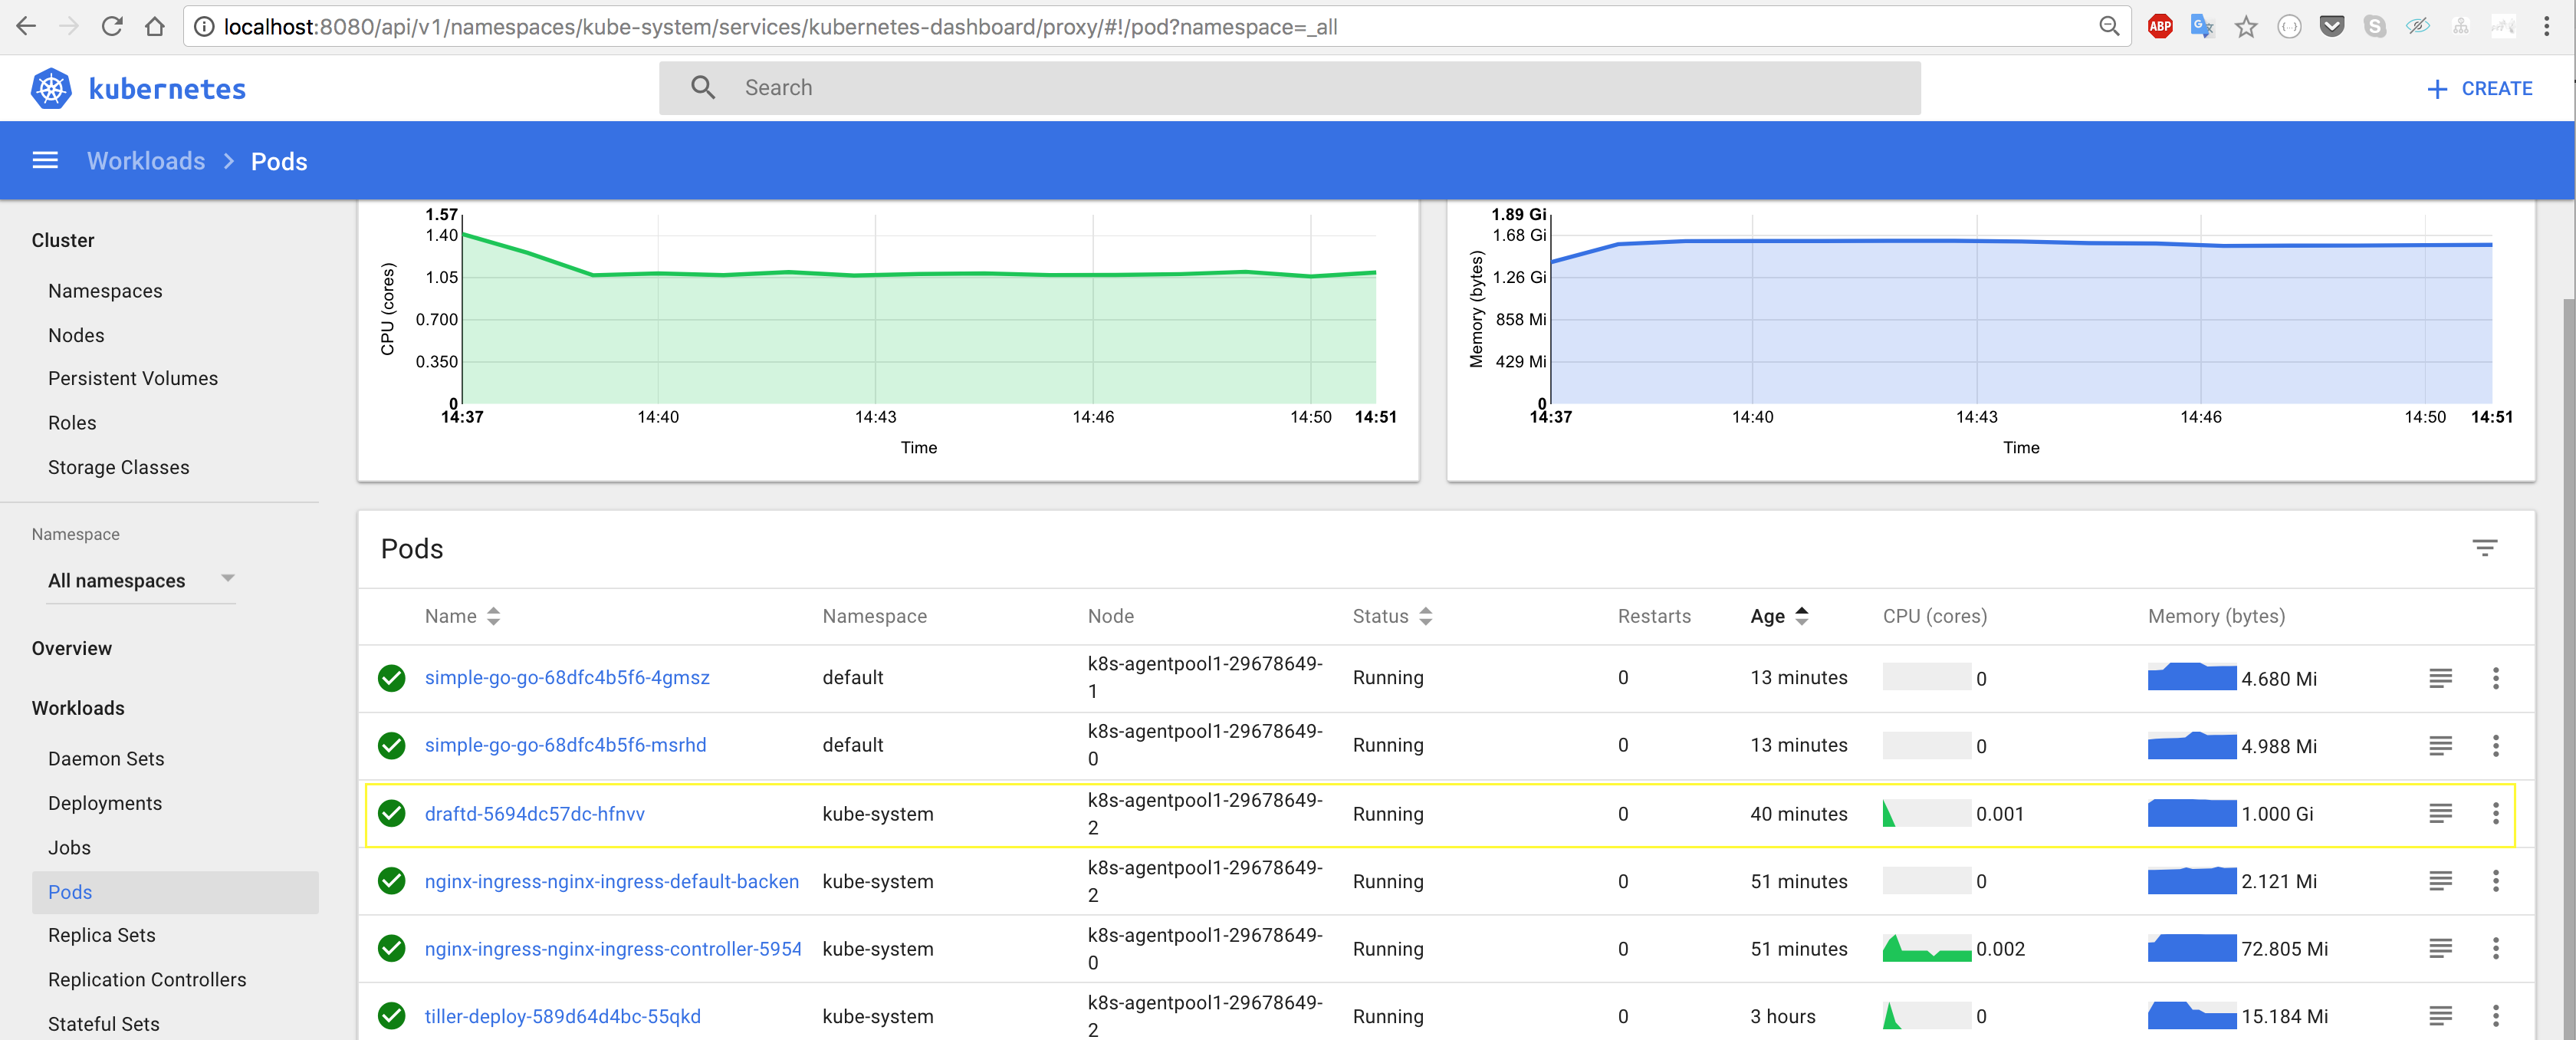
If you go to its logs, you will see the image building and pushing process:
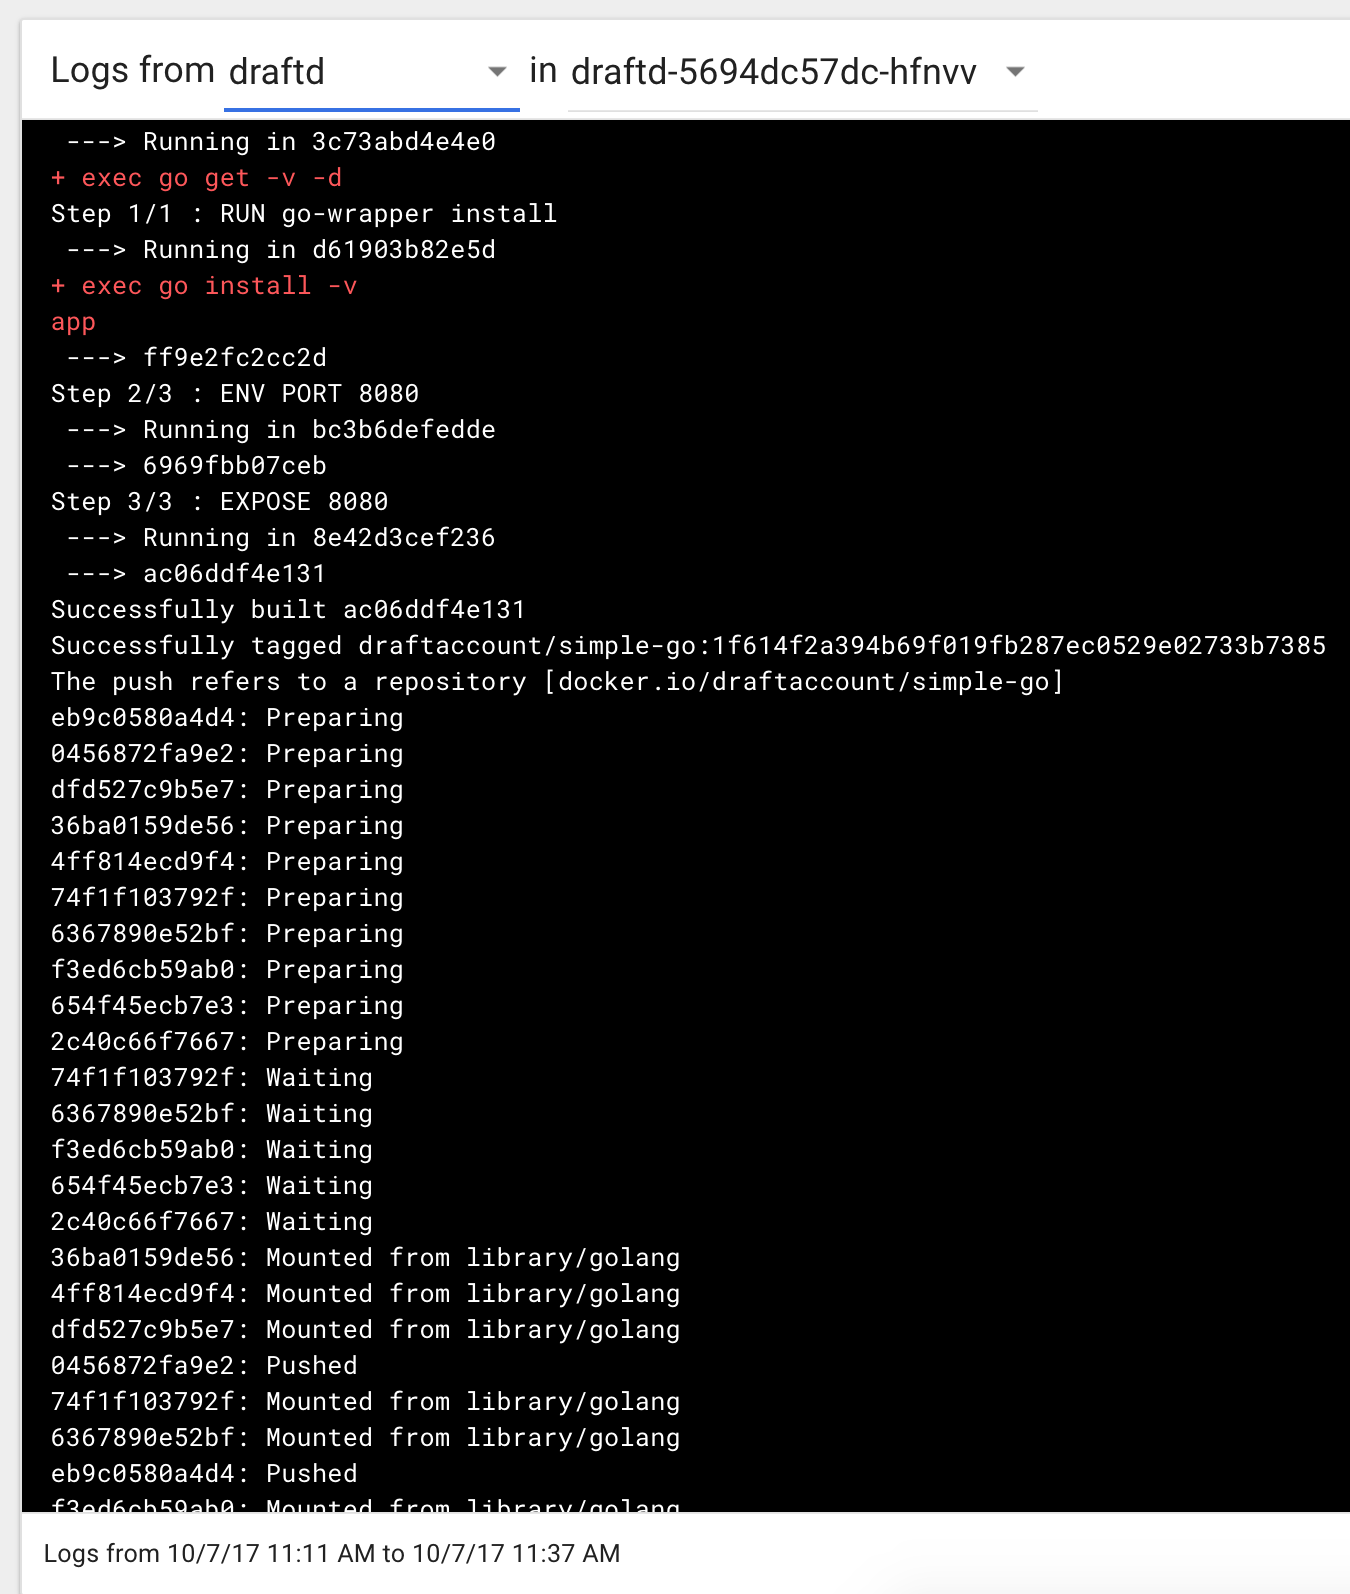
Among other logs, you can see that it pushd the image to the container image repository we specified when initially setting up draft, draftaccount, with the name we specified for the app. Let’s see that:
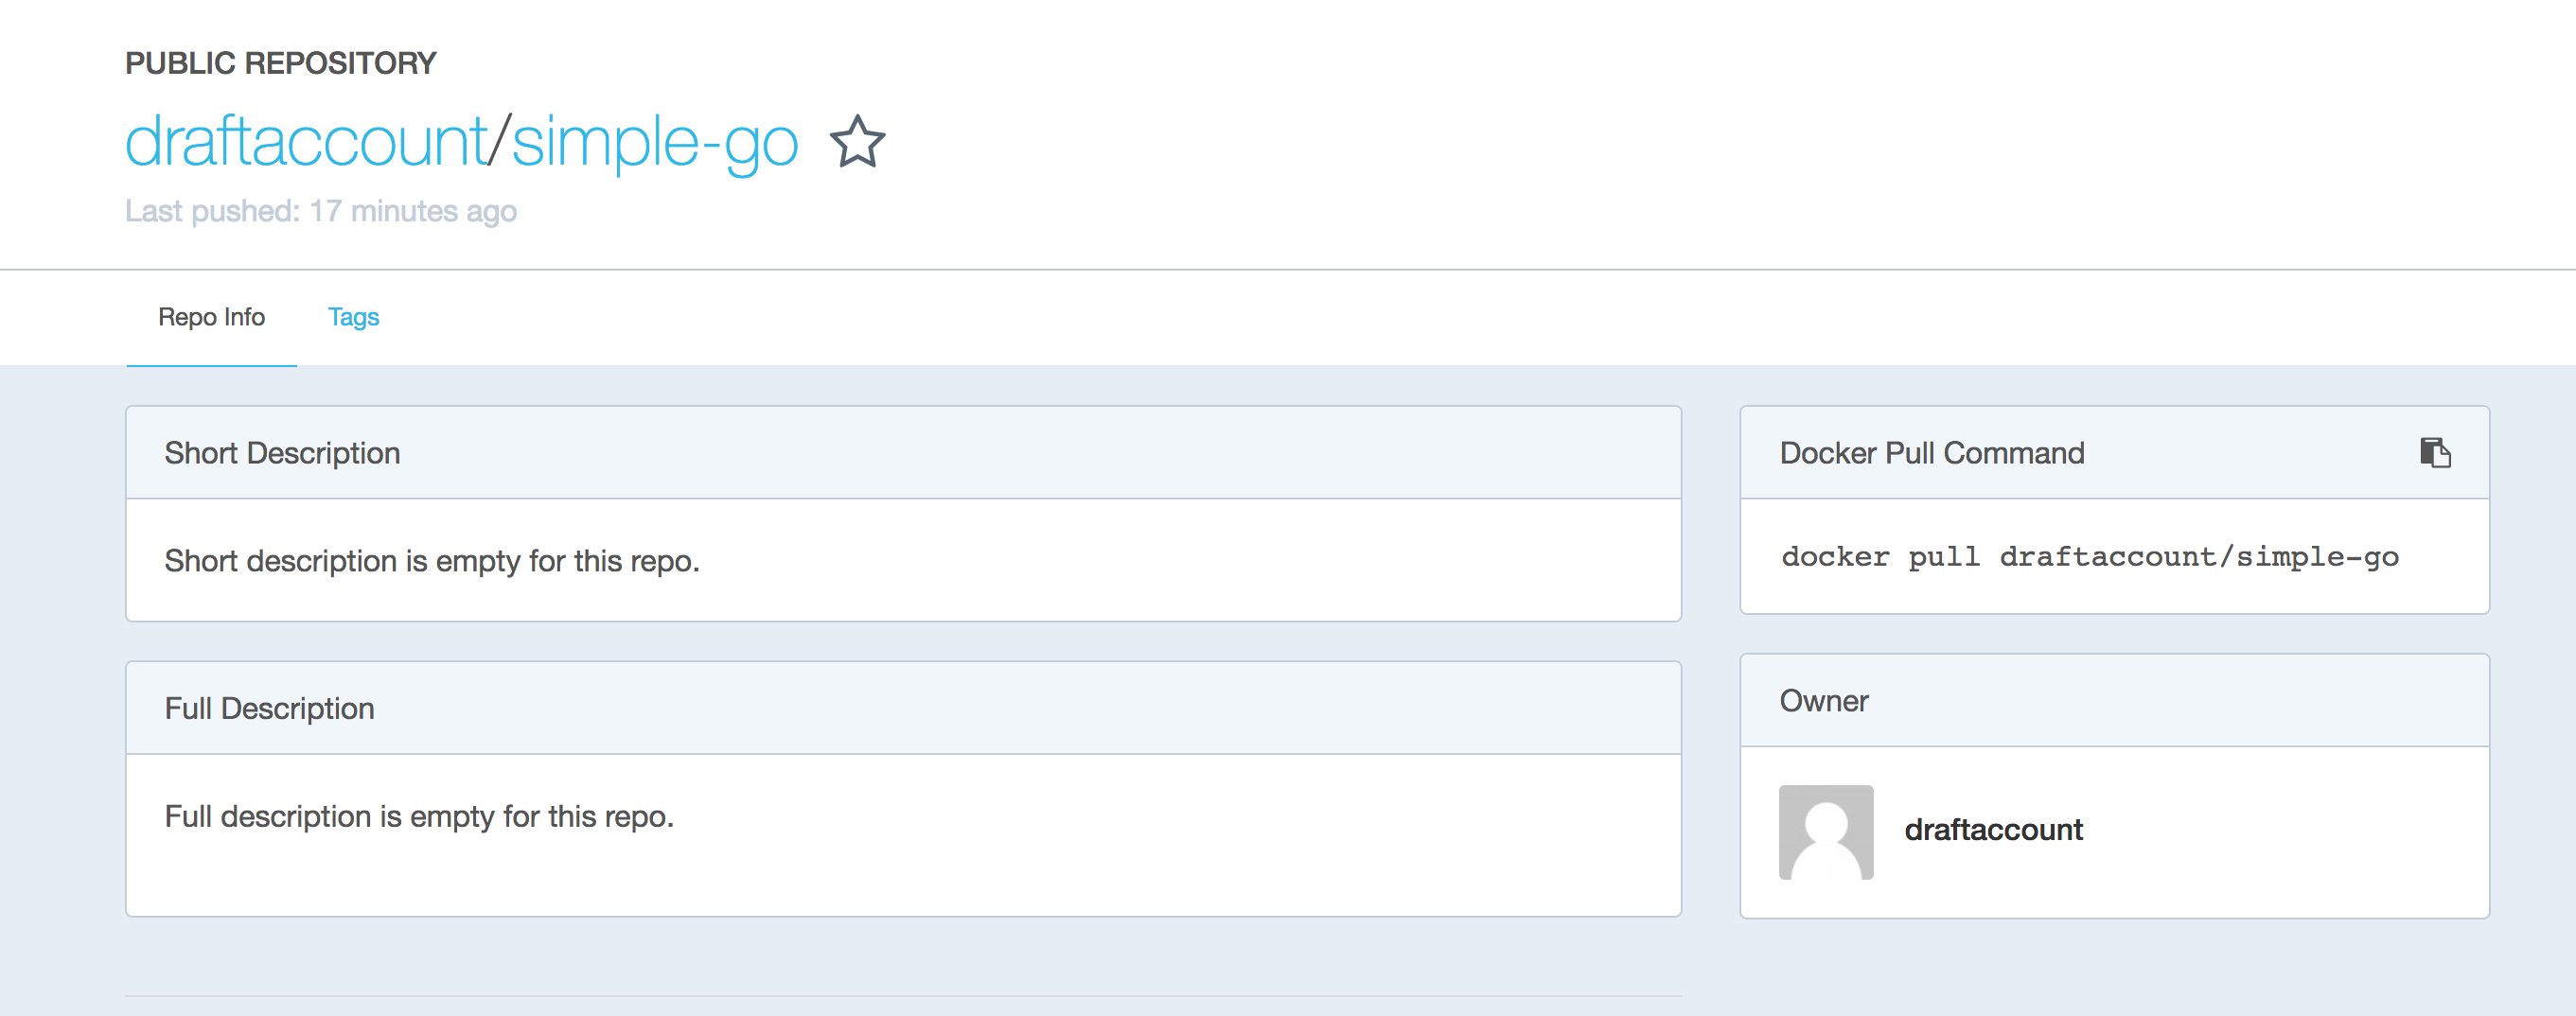
Now you can update the app locally (save the source code) and the app will be automatically updated on your cluster. You don’t need to have Go (or whatever language you use for developement) locally, not even Docker. Using Draft you don’t need to understand how to write a Dockerfile, or a Helm chart - you simply want your app in the cluster.
Exiting the container
When you are done working, simply exit the container - no global config was written, no context switching is necessary to change between different clusters - you simply have a directory with all config for your cluster - kubeconfig and config for helm and draft.
The next time you need to work with this cluster, either start this same container, or start a new one with the same command as above and mount the folder with the config.
Moreover, if you use multiple machines, you can keep the config folders in a file share (Azure Storage, Google Cloud Storage Bucket, S3) and start the container that has all the tools there. No more pasting SSH keys and cluster config files on Slack (guilty here…)
You can also use the same container with a different config folder for another cluster. That easy :)
Conclusion
We saw how to get started with Helm and Draft and tried a new approach at config management for multiple clusters using a config folder for each cluster.
We configured helm and draft, set up an ingress controller that used a domain we own, then deployed new apps to the cluster in seconds without writing Dockerfiles, Kubernetes deployment files or Helm charts. We just worry about our app.
If you have a better approach at any of the concepts presented in this article, or have any questions, please use the comments below. As always, thanks for reading, and any feedback is highly appreciated :)